Wait for the first build
If you entered an idea and selected Start building, the first production task starts after setup. Follow that task and wait for its preview instead of sending the same brief again.
MINIGROVE · GET STARTED
Start with one small battle in a classic tactical RPG. Add characters, art and animation, then deliver a version to players.
You decide what to make and what to keep. AI helps turn decisions into results you can review.
Product issue or suggestion? Tell the MiniGrove team →
Invitation-only. A project invitation is required; signup does not allocate a cloud computer.
01 / 09 · Create a project
Create a new project and build your game from an idea. Teammates can join the same MiniGrove project.
Currently invitation-only. Signing up does not automatically allocate a cloud computer. Register with the invited email and complete email verification.
If your account has cloud projects, the creation page also offers Import an existing project from GitHub for a private repository on your personal account; ZIP archives are not supported yet.
Log in and choose Create project on the dashboard. If the entry is missing, confirm your account has creation access. To join a teammate, skip to Join a project below.
These earlier teaching captures locate the controls. Their project, task and build content belongs to the fruit-catching sample, not this tactical RPG.
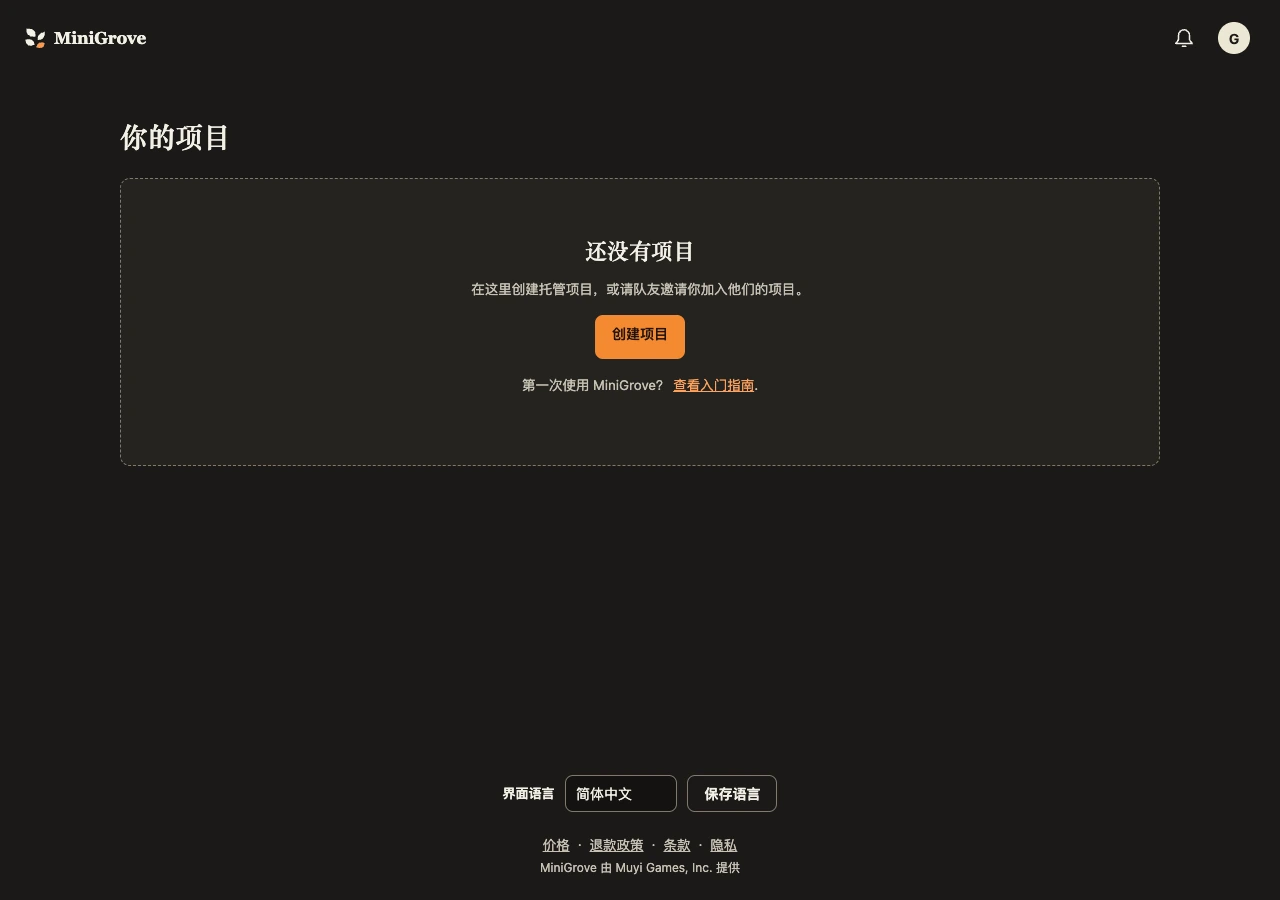
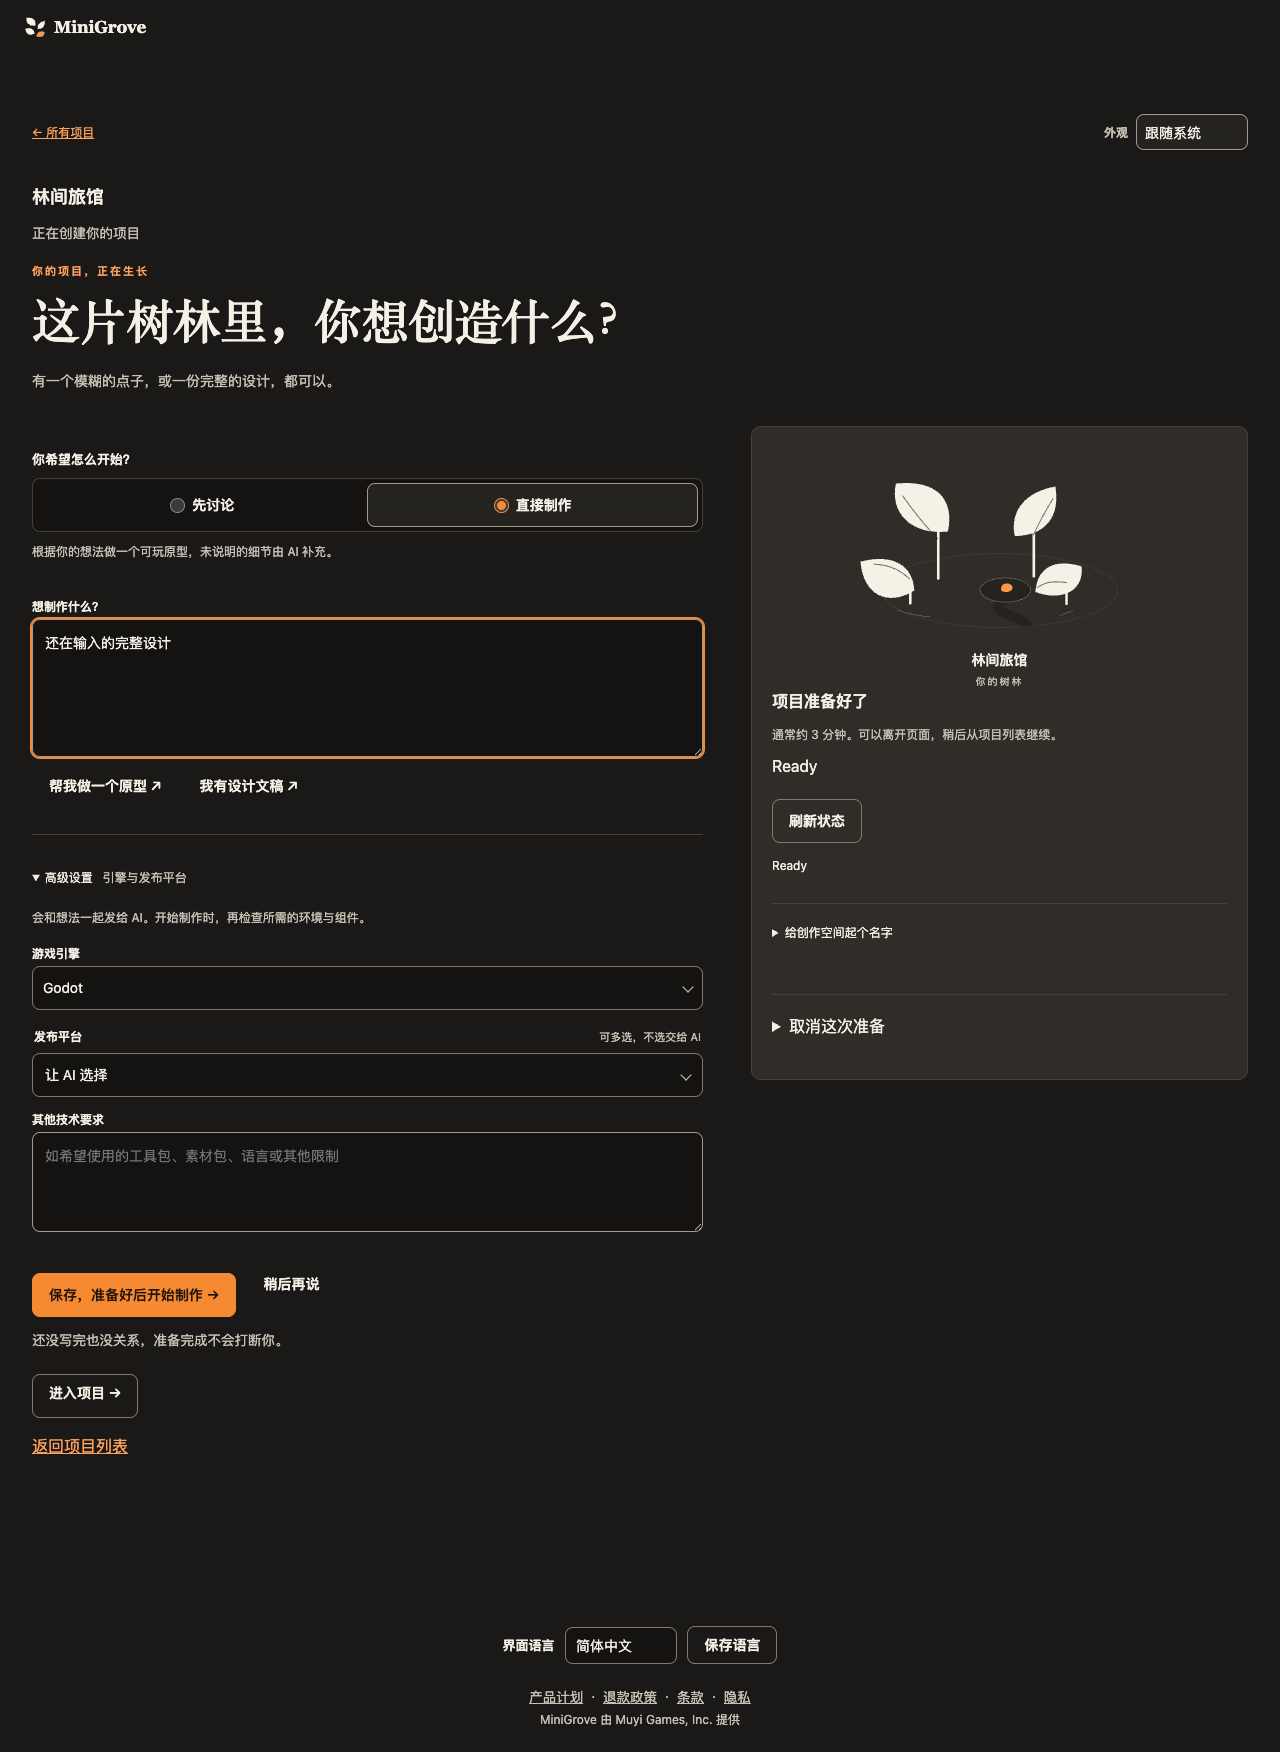
Enter a project name and create it. This only prepares your space. On the preparation page, choose how to start, then describe your idea or paste a design document.
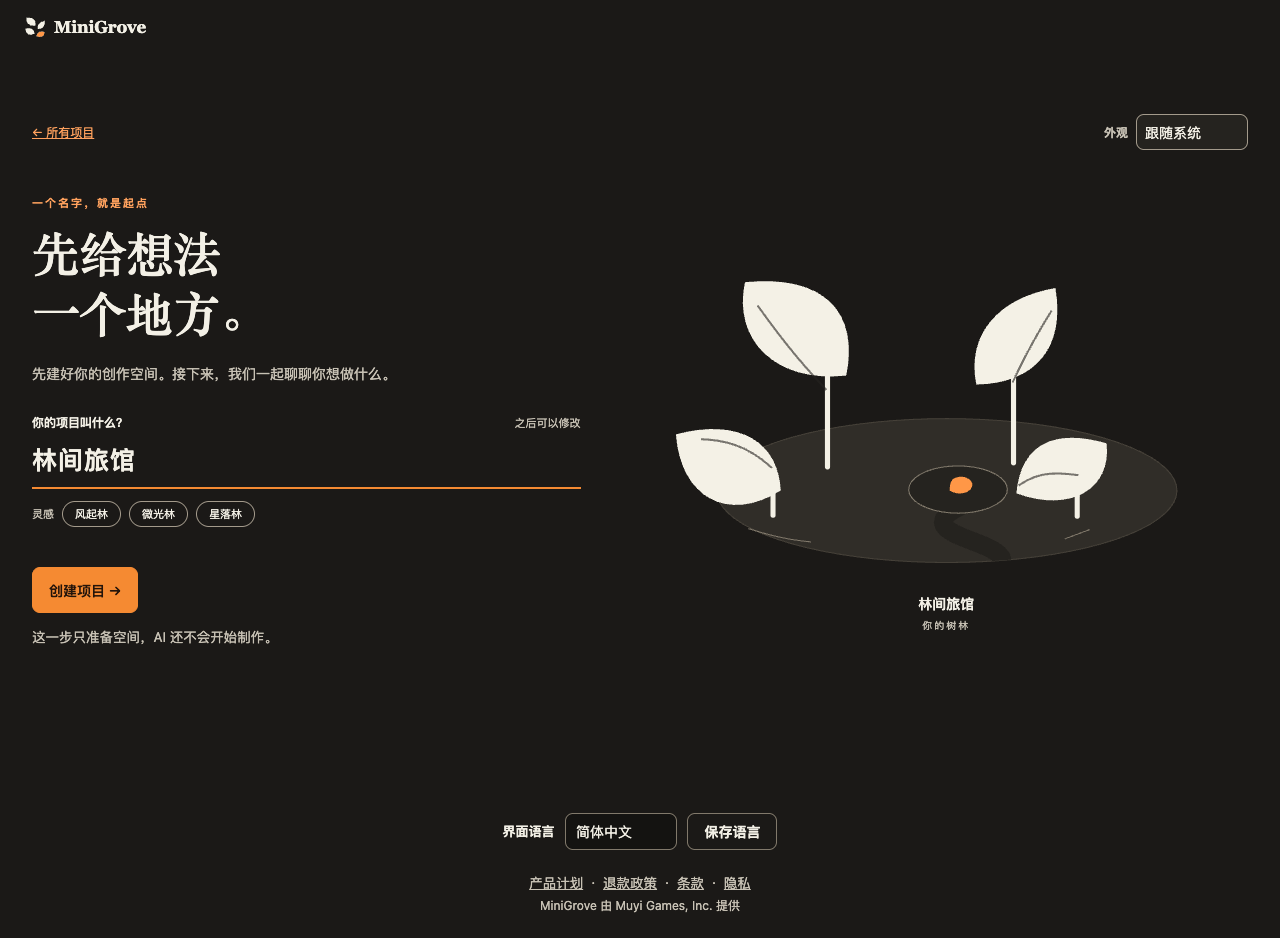
GitHub stores your project source. Choose Connect GitHub and continue, then sign in with the owner’s personal GitHub account. MiniGrove creates a private repository for the new project.
These earlier teaching captures locate the controls. Their project, task and build content belongs to the fruit-catching sample, not this tactical RPG.
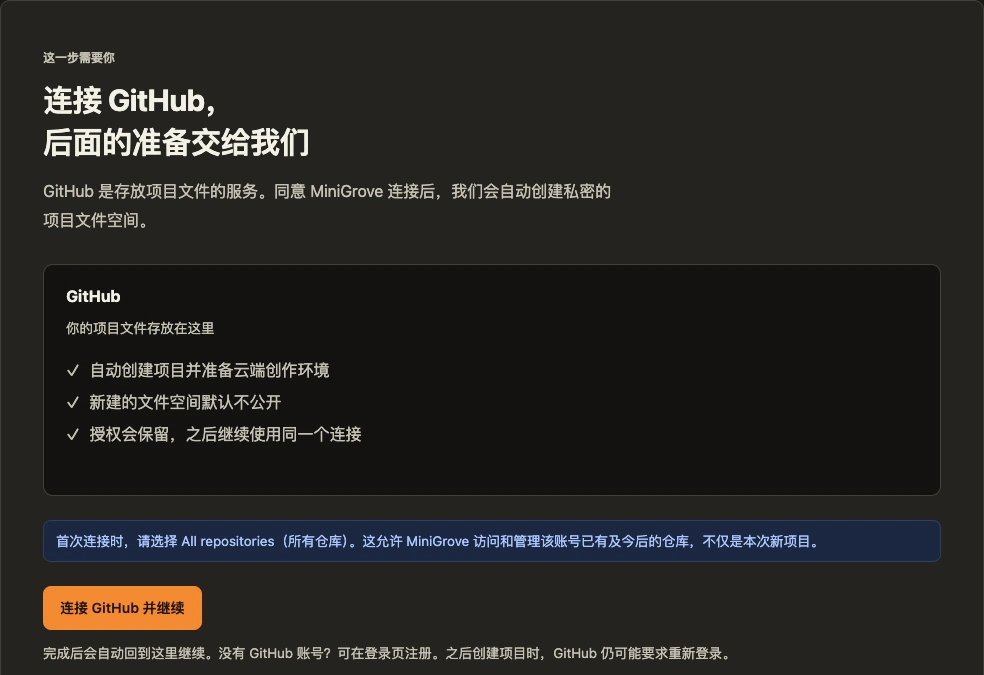
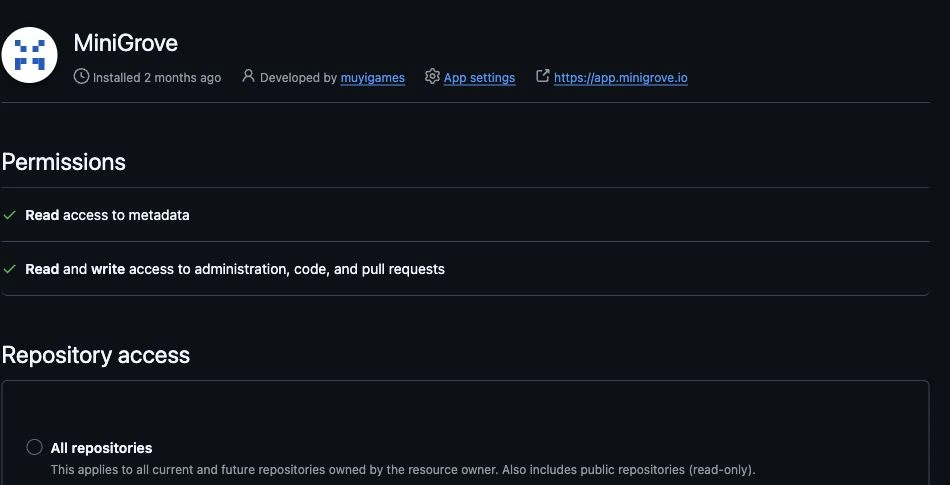
For first installation, follow the prompt and choose All repositories. This allows access to and management of all current and future repositories on that account. Administration covers repository management; Contents covers file access. Review the scope, then use GitHub’s installation confirmation button (Install).
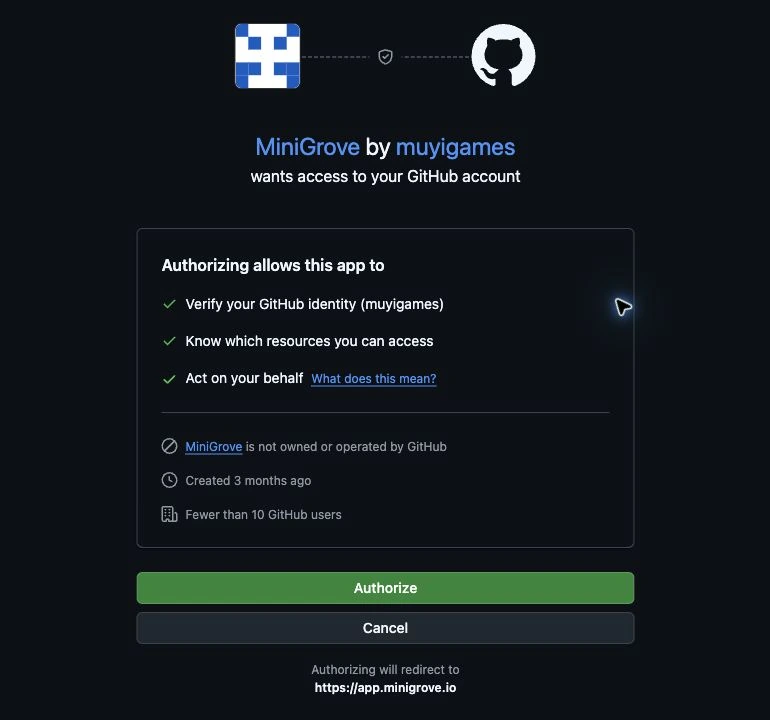
If this page appears, check the app is MiniGrove and the return address is app.minigrove.io. Review it, then choose Authorize. An installed account may only need this step.
The screenshot focuses on All repositories in existing installation settings; this installed account retains Only select repositories with no permission change.
Installation chooses which repositories the app can access; account authorization lets it act on your behalf. First connection may require both, while an existing connection may only ask for sign-in. The pictured installed account uses selected repositories. Such existing connections can continue, with a newly created repository added to the app’s scope. Keep your existing connection.
These earlier teaching captures locate the controls. Their project, task and build content belongs to the fruit-catching sample, not this tactical RPG.
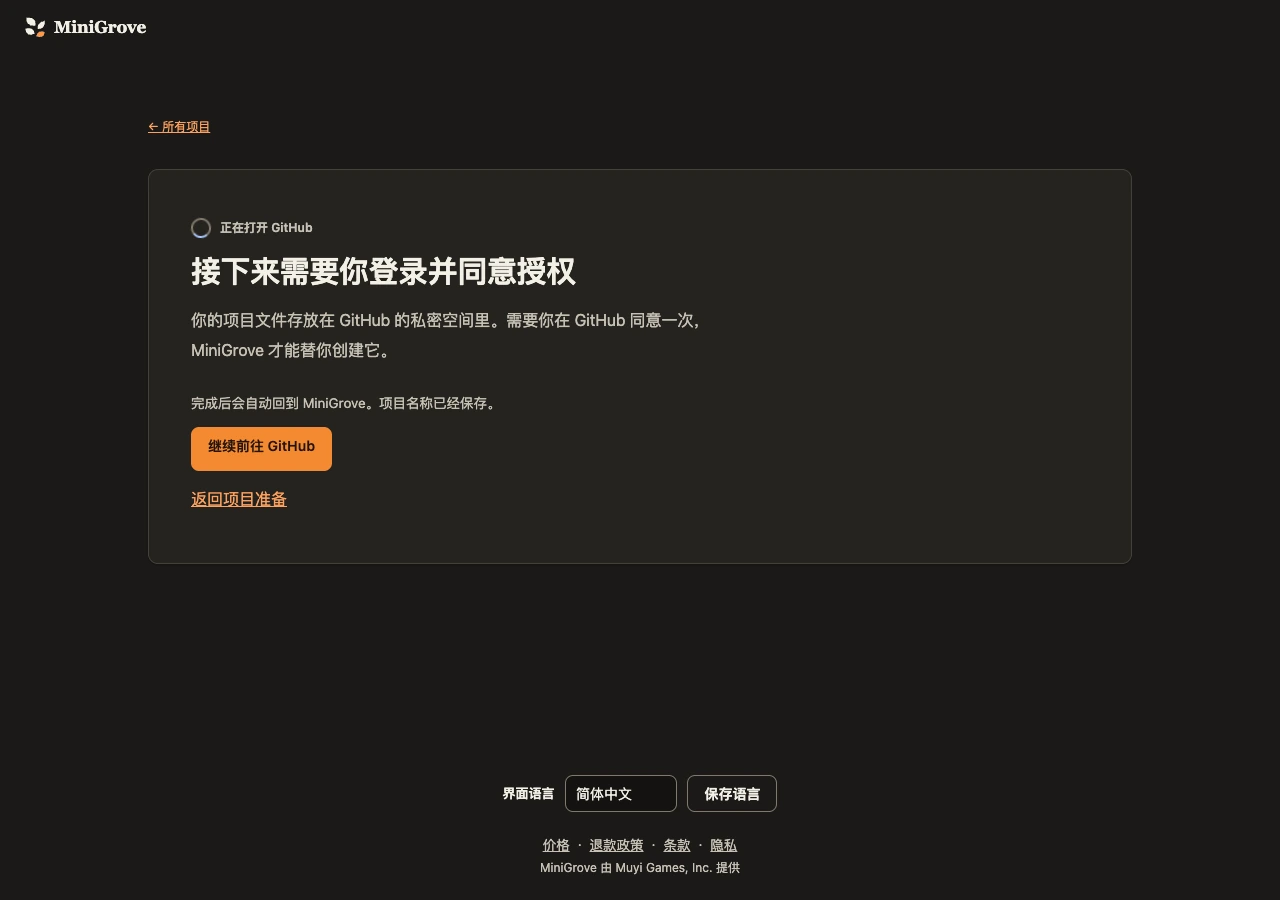
If the return does not happen, reopen the original preparation page, expand Already connected, or GitHub did not return?, and choose Check connection and continue. Continue this preparation instead of creating another project.
While preparing, choose Discuss first (default) or Start building, then write and save the corresponding input. Saving authorizes that discussion or production once ready. Advanced settings start folded and contain engine, platform and technical requirements; the Windows example can use Godot / Windows. Typing or waiting sends nothing, and readiness will not interrupt your draft. You can skip for now. Keep stalled or error messages and the page link for support.
Setup stalled or failed? Tell the MiniGrove team →
These earlier teaching captures locate the controls. Their project, task and build content belongs to the fruit-catching sample, not this tactical RPG.
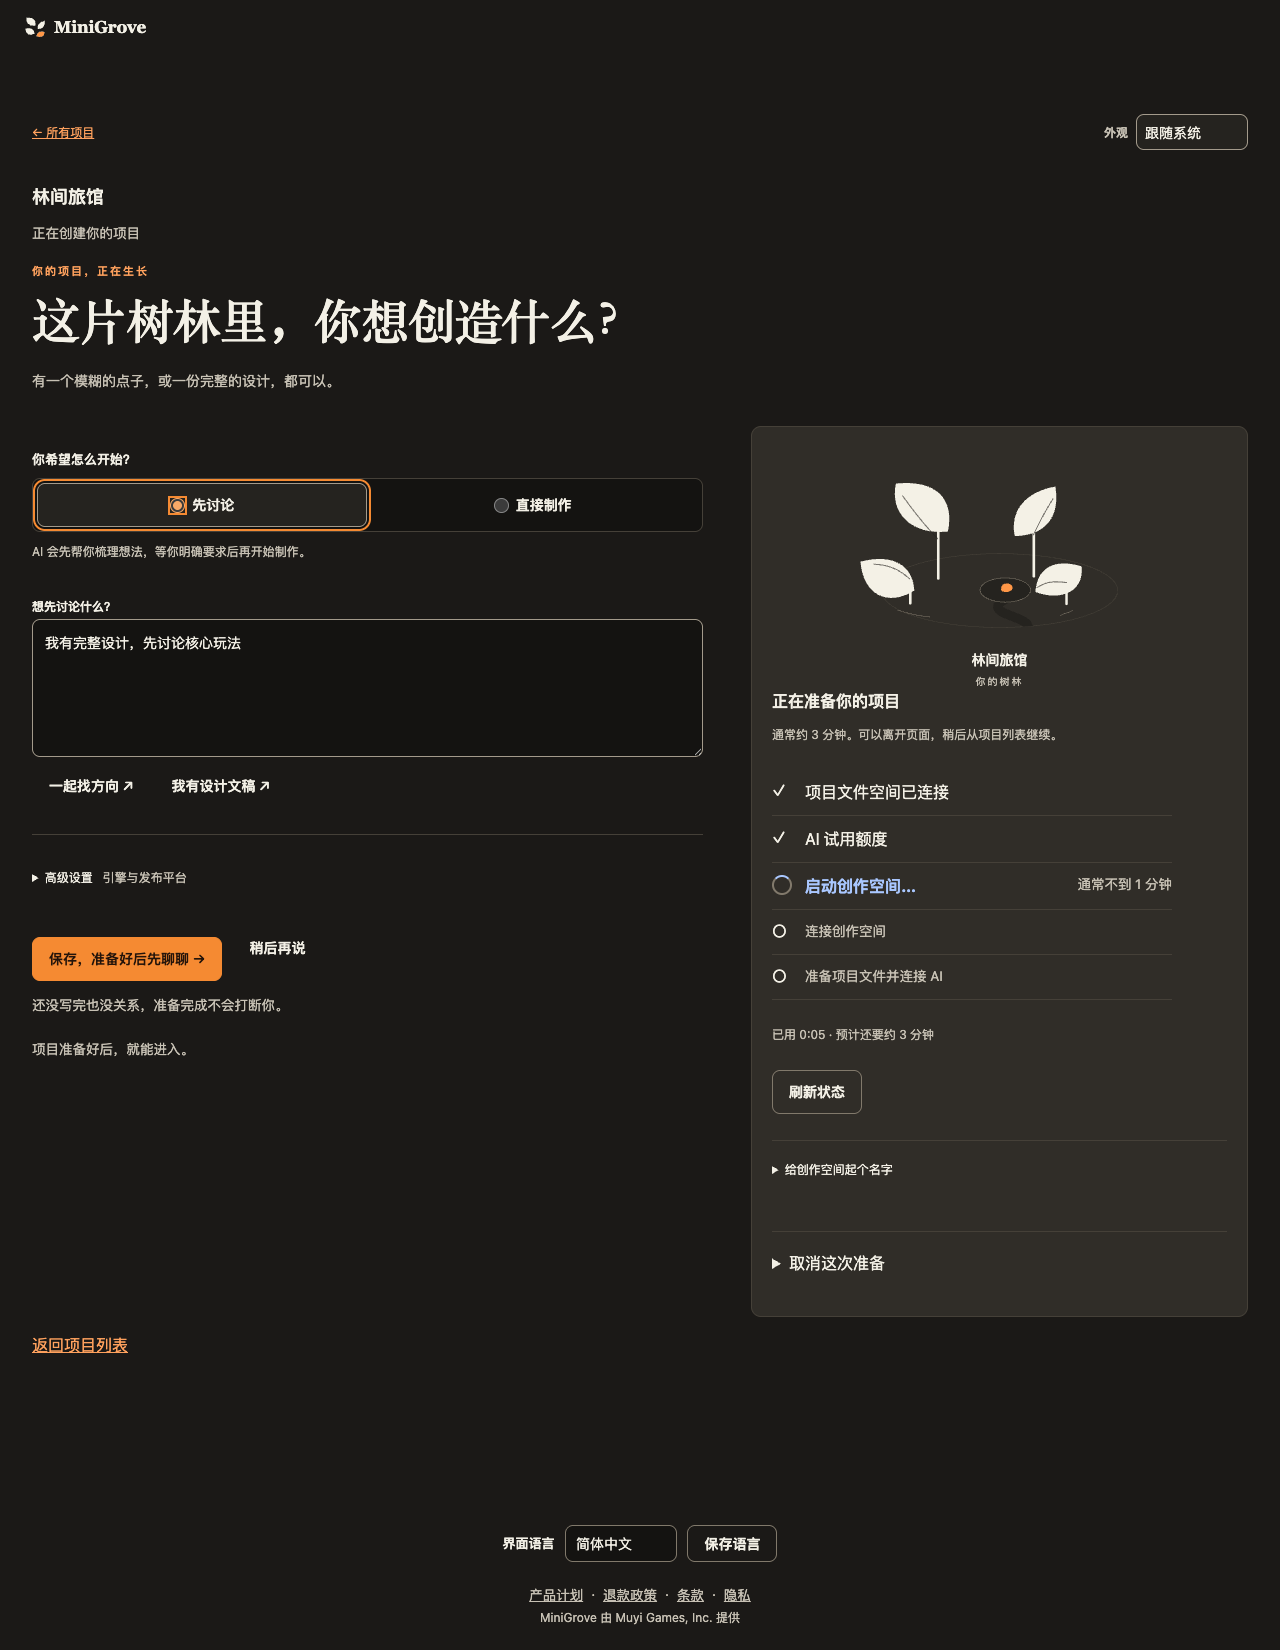
When Project is ready appears, choose Enter project →. Continue the original discussion or production conversation if you saved an idea, or start inside the project later.
These earlier teaching captures locate the controls. Their project, task and build content belongs to the fruit-catching sample, not this tactical RPG.
The project owner invites teammates from member management using their MiniGrove email address. Invitations follow project permissions and available capacity; ask the owner or MiniGrove support if the entry is unavailable.
Log in with the invited email, accept the invitation and open your team’s project. Members share its files and model connection; no separate project or repeated GitHub connection is needed.
This guide uses Windows 10/11 x64 with Godot standard / GDScript. In Advanced options choose Godot and Windows. Steam distribution is a later step.
These earlier teaching captures locate the controls. Their project, task and build content belongs to the fruit-catching sample, not this tactical RPG.
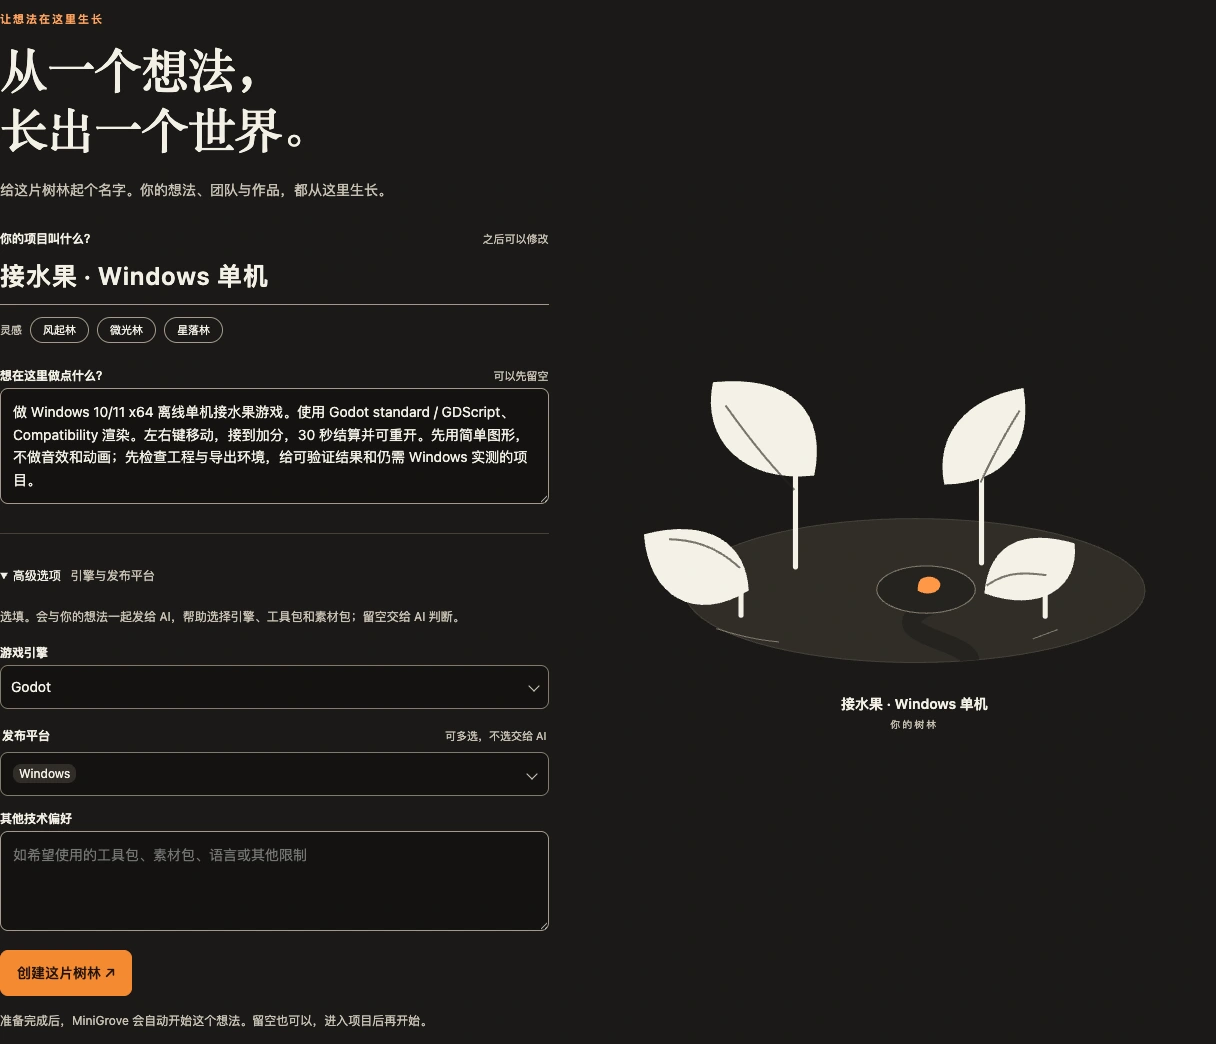
These preferences set the final delivery target, not a separate development workflow. For Windows too, ask AI for a browser-playable version and use preview marks. Check Compatibility rendering and the export environment; test the final Windows package at delivery. A capable computer can download Godot and templates on demand, so the first build may take longer.
Build an offline Windows 10/11 x64 tactical RPG with Godot standard / GDScript and Compatibility rendering. Start with one small battle: grid movement, turn order, a basic attack, wait, win/loss and restart. Provide a browser playtest for preview marks during development. Create the final Windows candidate from mainline and test its complete ZIP on Windows.02 / 09 · Your key or subscription (optional)
You can skip this chapter. Projects include AI usage; configure this only to use your own key or subscription.
Monthly allowance renews each month; see AI allowance for the balance and reset date. Trial and extra grants follow the validity shown there. Expand setup only to change sources.
Use included allowance and start your first idea →
Members use the project’s existing allowance and connection. The project owner configures any change of source.
Project menu → Connections and keys → Models → Change model source → Your API key (BYOK)
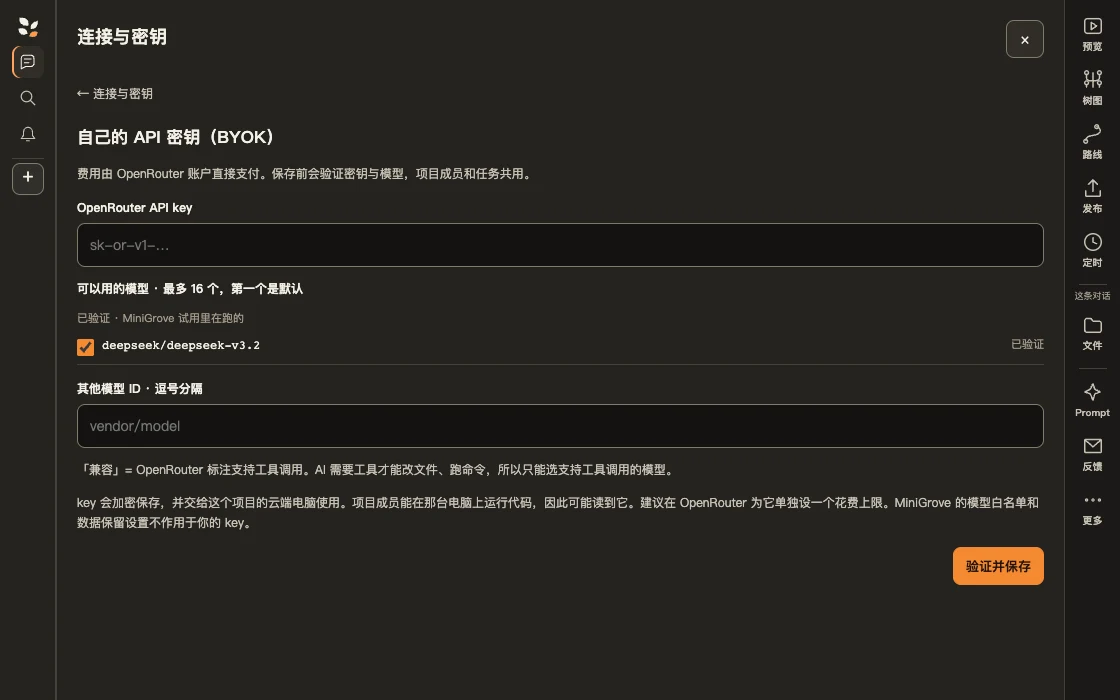
Create a dedicated key in your OpenRouter account and check its budget and available models.
Enter your OpenRouter key, choose tool-compatible models, then verify and save.
Confirm BYOK is the source and the state says “Saved · Received by cloud computer”, then verify it with a small task.
Need your own key? Open OpenRouter API Keys, sign in, and create a dedicated key for the project. Choose models that support tool calling and pass this form’s verification. Availability follows your account and validation result. If your project already has a working model source, continue directly.
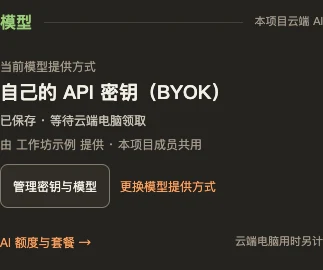
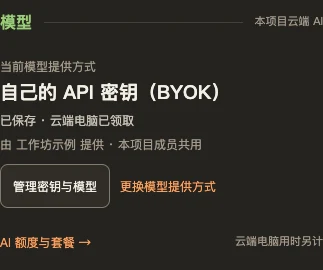
When your project offers the ChatGPT subscription option and its permissions, plan and cloud computer support it, a project member can connect it without creating an OpenRouter key.
Project menu → Connections and keys → Models → Change model source → ChatGPT subscription
This connection is shared by current/future project members and enabled tasks. Members able to run code may read saved credentials. Connect only after accepting that scope.
Choose Connect, open the OpenAI authorization page and enter the code shown in the connection view. Keep passwords and codes out of project chat.
Once connected and the computer is online and ready, start a new conversation. Finish or stop queued/running tasks before switching; history is kept. Exhaustion does not automatically switch to API billing.
If the option is missing or connection is unavailable, follow the project’s message and use its existing model source. Cloud computer time and the MiniGrove plan are accounted for separately.
Only when your project offers the Claude option and its permissions and computer support it can the owner connect their own Claude Pro/Max. It is limited to single-person projects; use the existing source if the option is absent.
Connections and keys → Models → Change model source → Claude subscription (single-person project)
Open Claude authorization from the page and return the code to the connection form, keeping it out of chat. Wait for connection before starting a new conversation. Before inviting teammates or choosing another source, disconnect Claude and wait for the computer’s confirmation.
03 / 09 · Start your first idea
Check your project’s progress before creating a task.
If you entered an idea and selected Start building, the first production task starts after setup. Follow that task and wait for its preview instead of sending the same brief again.
For Discuss first, the idea saved on the preparation page starts a discussion. Continue refining your design there. If you have not saved an idea, start a conversation inside the project. When ready to build: + New → Task. Describe the scope and acceptance checks, then send.
These earlier teaching captures locate the controls. Their project, task and build content belongs to the fruit-catching sample, not this tactical RPG.
+ New → Task.
Describe what to build, what to preserve and how to test it.
Follow the queue and progress, then playtest this task’s version.
This guide follows a classic tactical RPG. Validate one small battle first; each task keeps a version you can playtest independently.
Build one small battle for a classic tactical RPG: an 8-by-6 grid, 3 allies and 3 enemies, with turn-order movement, a basic attack and wait. Defeat all enemies to win, lose when all allies fall, and allow restart. Keep the engine and final delivery target already chosen for this project. During development, first provide a browser-playable version for playtesting and selection edits. Use simple characters and scenery; leave story expansion, equipment and skill trees for later. Provide the current task’s browser playtest link, controls, completed checks and unverified items.While gameplay is being built, use + New → Discussion to talk through art or music. The original task continues. Choose Task for asset or feature production.
These earlier teaching captures locate the controls. Their project, task and build content belongs to the fruit-catching sample, not this tactical RPG.
For example: “Warm illustration or pixel art? Compare first; do not change the game.”
Keep a future idea. Choose Start when you are ready to work on it.
Use separate tasks for animation and sound, with clear boundaries to avoid editing the same feature. They do not combine automatically: review the base, merge it into mainline, then sync later tasks before integration.
I want an exploration and management game. Compare two core loops, their players, appeal and production scope. Discuss before building.MiniGrove Advisory Group offers Positioning Office Hours. Use /mg-positioning-office-hours for long-term positioning; Jam and learning goals suit a lighter review. Availability follows your project’s skill menu.
When your project has teammates, mention someone in a task that has completed its first production turn. They confirm in the same chat, then continue with AI.
These earlier teaching captures locate the controls. Their project, task and build content belongs to the fruit-catching sample, not this tactical RPG.
Turn off To followed by the AI’s name. Type @, select a project member and send.
Your teammate replies in the original chat and agrees on the edit scope.
Your teammate turns To AI on before sending an instruction, then mentions you here for review.
These earlier teaching captures locate the controls. Their project, task and build content belongs to the fruit-catching sample, not this tactical RPG.
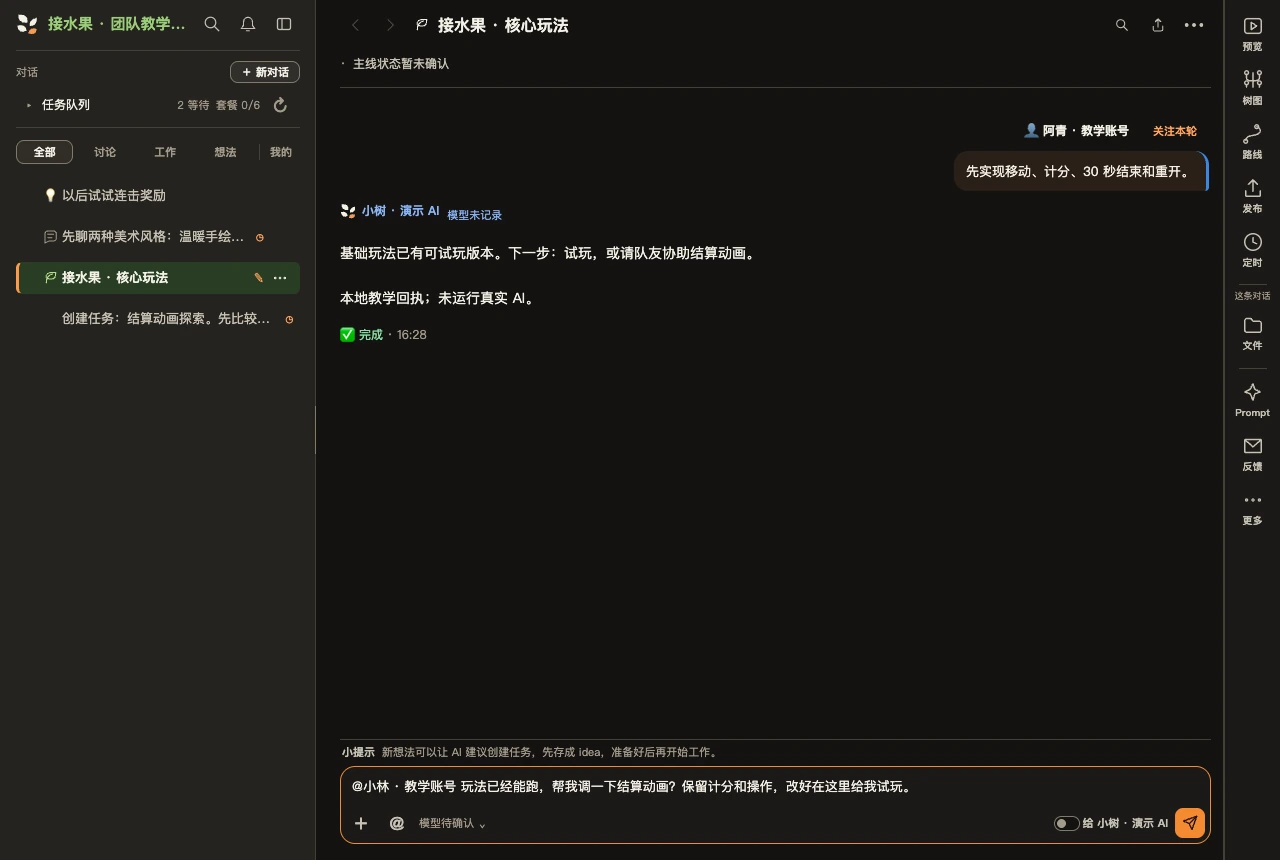
Mentioning a teammate alone does not choose the AI recipient. Merge after review; a handoff does not merge versions.
04 / 09 · Playtest and edit
During development, prioritize browser playtests and preview marks. Windows and Web share this iteration workflow; validate final builds on their delivery platform.
These earlier teaching captures locate the controls. Their project, task and build content belongs to the fruit-catching sample, not this tactical RPG.
Select the current production task and wait for its preview link. Done means the turn ended; playtest it yourself before accepting.
On a wide screen use ▶ Preview on the right rail; on narrow screens choose Preview from the view controls. A project deployment link in the reply also opens there. Check the task name and preview tab’s version label.
Focus the game. Select a character and check movement range, positioning, attack, wait and enemy actions, then play through win/loss and restart. If no preview is supplied, ask for it in this task; do not treat Done as acceptance.
Make the tactical RPG action menu easier to select. Its annotation subtask merges back into the current Core gameplay task.
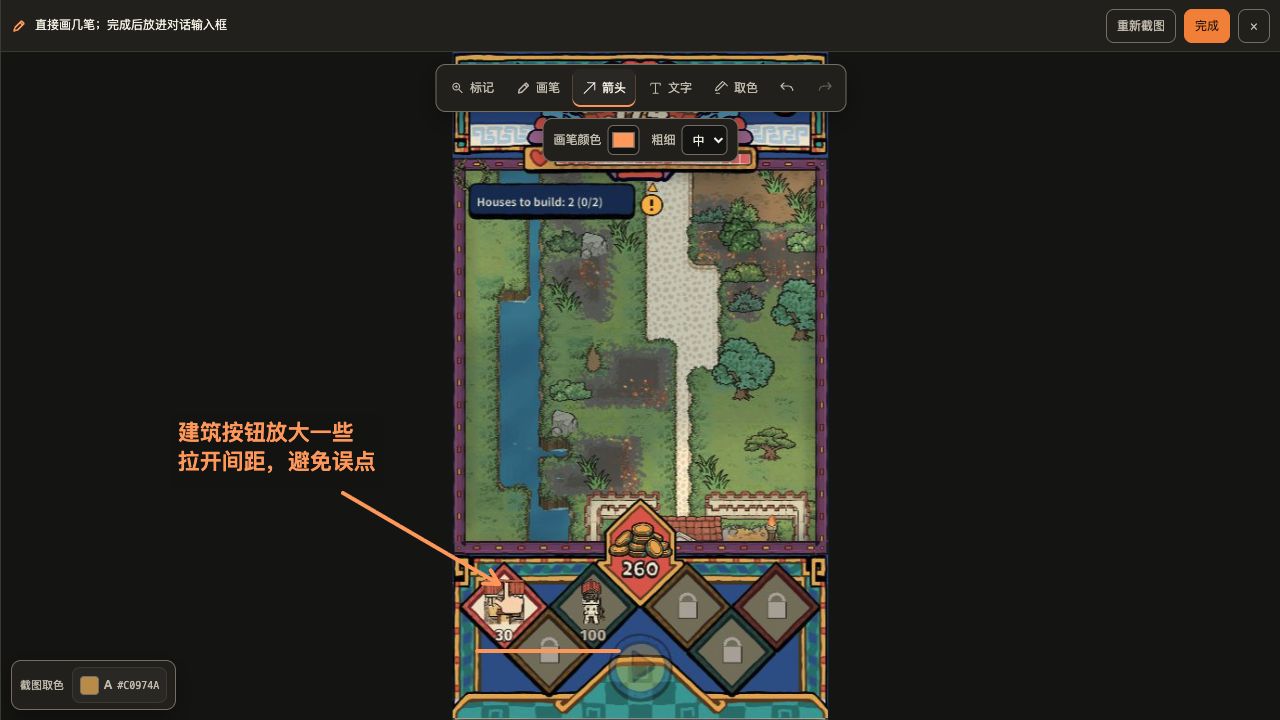
These earlier teaching captures locate the controls. Their project, task and build content belongs to the fruit-catching sample, not this tactical RPG.
In this task’s Preview, open the round key and choose Mark. Use markers, brush, arrows, text or color picking to point out the action menu, a character or a tile. State what to change and preserve. Done adds the image and notes to the composer; review before sending.
Turn on Subtask in the composer row, add your request and send. A new edit subtask is created and merges back into this task once its checks pass; until then this task stays as it is.
Open the new subtask in the conversation list. Once its preview is published, choose View subtask result and restart: check the action menu while movement range and damage rules stay the same. Not right yet? Keep asking in the subtask.
Enlarge the Move, Attack and Wait buttons and separate them to prevent misclicks. Preserve movement range, damage, turn order and the existing rules.The subtask merges back on its own once its checks pass. Wait for the green success state in its progress strip, then choose View parent task update. This opens the updated parent preview; the conversation may still be the subtask.
Windows games use the same browser playtest and preview-mark workflow above. Final Windows acceptance uses the complete ZIP from a mainline candidate. A working Web preview does not establish a Windows pass.
Ask for this task’s browser-playable version, test gameplay and select areas to edit. If it cannot yet be provided, ask AI for the reason, completed checks and unverified items; AI completion is not your acceptance.
Candidates come from mainline. Enable and check Windows in Release, create a candidate, then download its ZIP and play it on Windows.
Record the candidate version, screenshots, reproduction steps and expected behavior in a new fix task. Merge the fix, create another candidate and test the new package.
Windows packaging, download and playtest steps →
Windows candidate v0.1.0-rc.1: movement stops after switching from fullscreen to windowed. Reproduce: launch game.exe → fullscreen → windowed → left/right keys. Movement should still work. Screenshot attached. In a new task, check the candidate source against current mainline, then fix it. Preserve movement range and damage rules; report checks and remaining Windows tests.The selection walkthrough above applies to browser playtests, including those for a Windows target. Send native Windows screenshots and reproduction steps to a fix task; do not select directly in the native window.
After reviewing the original task, merge it into mainline. Mainline and merging
05 / 09 · Mainline and merging
Mainline is the project’s shared base. Sync brings its updates into a task; merge brings reviewed task changes into mainline.
Two merge destinations
Selection subtask → Merge back to parent → original Core gameplay. After reviewing that task → Merge into mainline… → mainline. Displayed tree hierarchy does not change an ordinary task’s merge destination.
On the reviewed Core gameplay task, choose ⋯ → Merge into mainline…, check the destination and changes, then confirm. Once merged, the base is in mainline. Continue to building a candidate in the next chapter.
These earlier teaching captures locate the controls. Their project, task and build content belongs to the fruit-catching sample, not this tactical RPG.
Final Windows delivery: iterate in the browser during development and merge after task checks. Before delivery, build a candidate for Windows acceptance. Fix issues, merge and rebuild before public delivery. Windows delivery steps →
After merging the base, build and review a candidate. Expand the A/B example when you need parallel production.
Merge Core gameplay into mainline → + New → Task to create task A; repeat for task B. Alternatively, right-click mainline in the tree and choose New top-level task.
The clip uses the tree entry for B: name it B · Attack sound, confirm the project default branch as the base, then submit. Each task has its own working version; start B while A is still running.
Compare two movement strengths for one character’s walk cycle.
Audition two short sounds, then integrate the chosen one.
These earlier teaching captures locate the controls. Their project, task and build content belongs to the fruit-catching sample, not this tactical RPG.
Bring the summary, asset paths and decisions to each new conversation. Check its base and any uncommitted-file choice; cancel and reselect if the base is wrong.
A changes animation only and B sound only. Compare options before integration. Advanced topics below has the detailed briefs and actual material demos. See advanced topics →
Playtest, then use Merge into mainline… to review the destination, changes and checks. The destination is mainline; resolve conflicts or failed checks before continuing.
Select and test A, checking animation and gameplay. Use ⋯ → Merge into mainline… and wait for the merge to finish.
Return to B · Attack sound and send the request below. Open B’s updated browser playtest after syncing. Check A’s animation and B’s sound together, also for a Windows target. Validate the final package separately on Windows. Resolve conflicts first.
After reviewing B, merge it using the same menu. Check mainline in 🚀 Release, then create a candidate build as described below. For final acceptance, Web uses that candidate’s Preview ↗ link; Windows uses its complete ZIP, extracted and tested on Windows. Neither uses an old A/B tab instead.
A · Character walk animation has entered mainline. Sync the latest committed mainline into this B · Attack sound task, preserving B’s audio changes. Explain conflicts first. Provide a new B preview and changed-file list. Do not merge yet.06 / 09 · Publish and share
Windows packages and minigrove.games Web publication have separate delivery paths. Both start with a mainline candidate and review of that exact build.
When your project offers Windows builds and its checks are ready, follow these steps for a testable package. Merging into mainline prepares a candidate; it does not establish Windows acceptance or public publication.
🚀 Release → Platforms and candidates → Windows. The project owner enables Windows and saves. Cloud projects use their project computer by default; choose a computer if a selector is offered. Check both engine and computer readiness.
These earlier teaching captures locate the controls. Their project, task and build content belongs to the fruit-catching sample, not this tactical RPG.
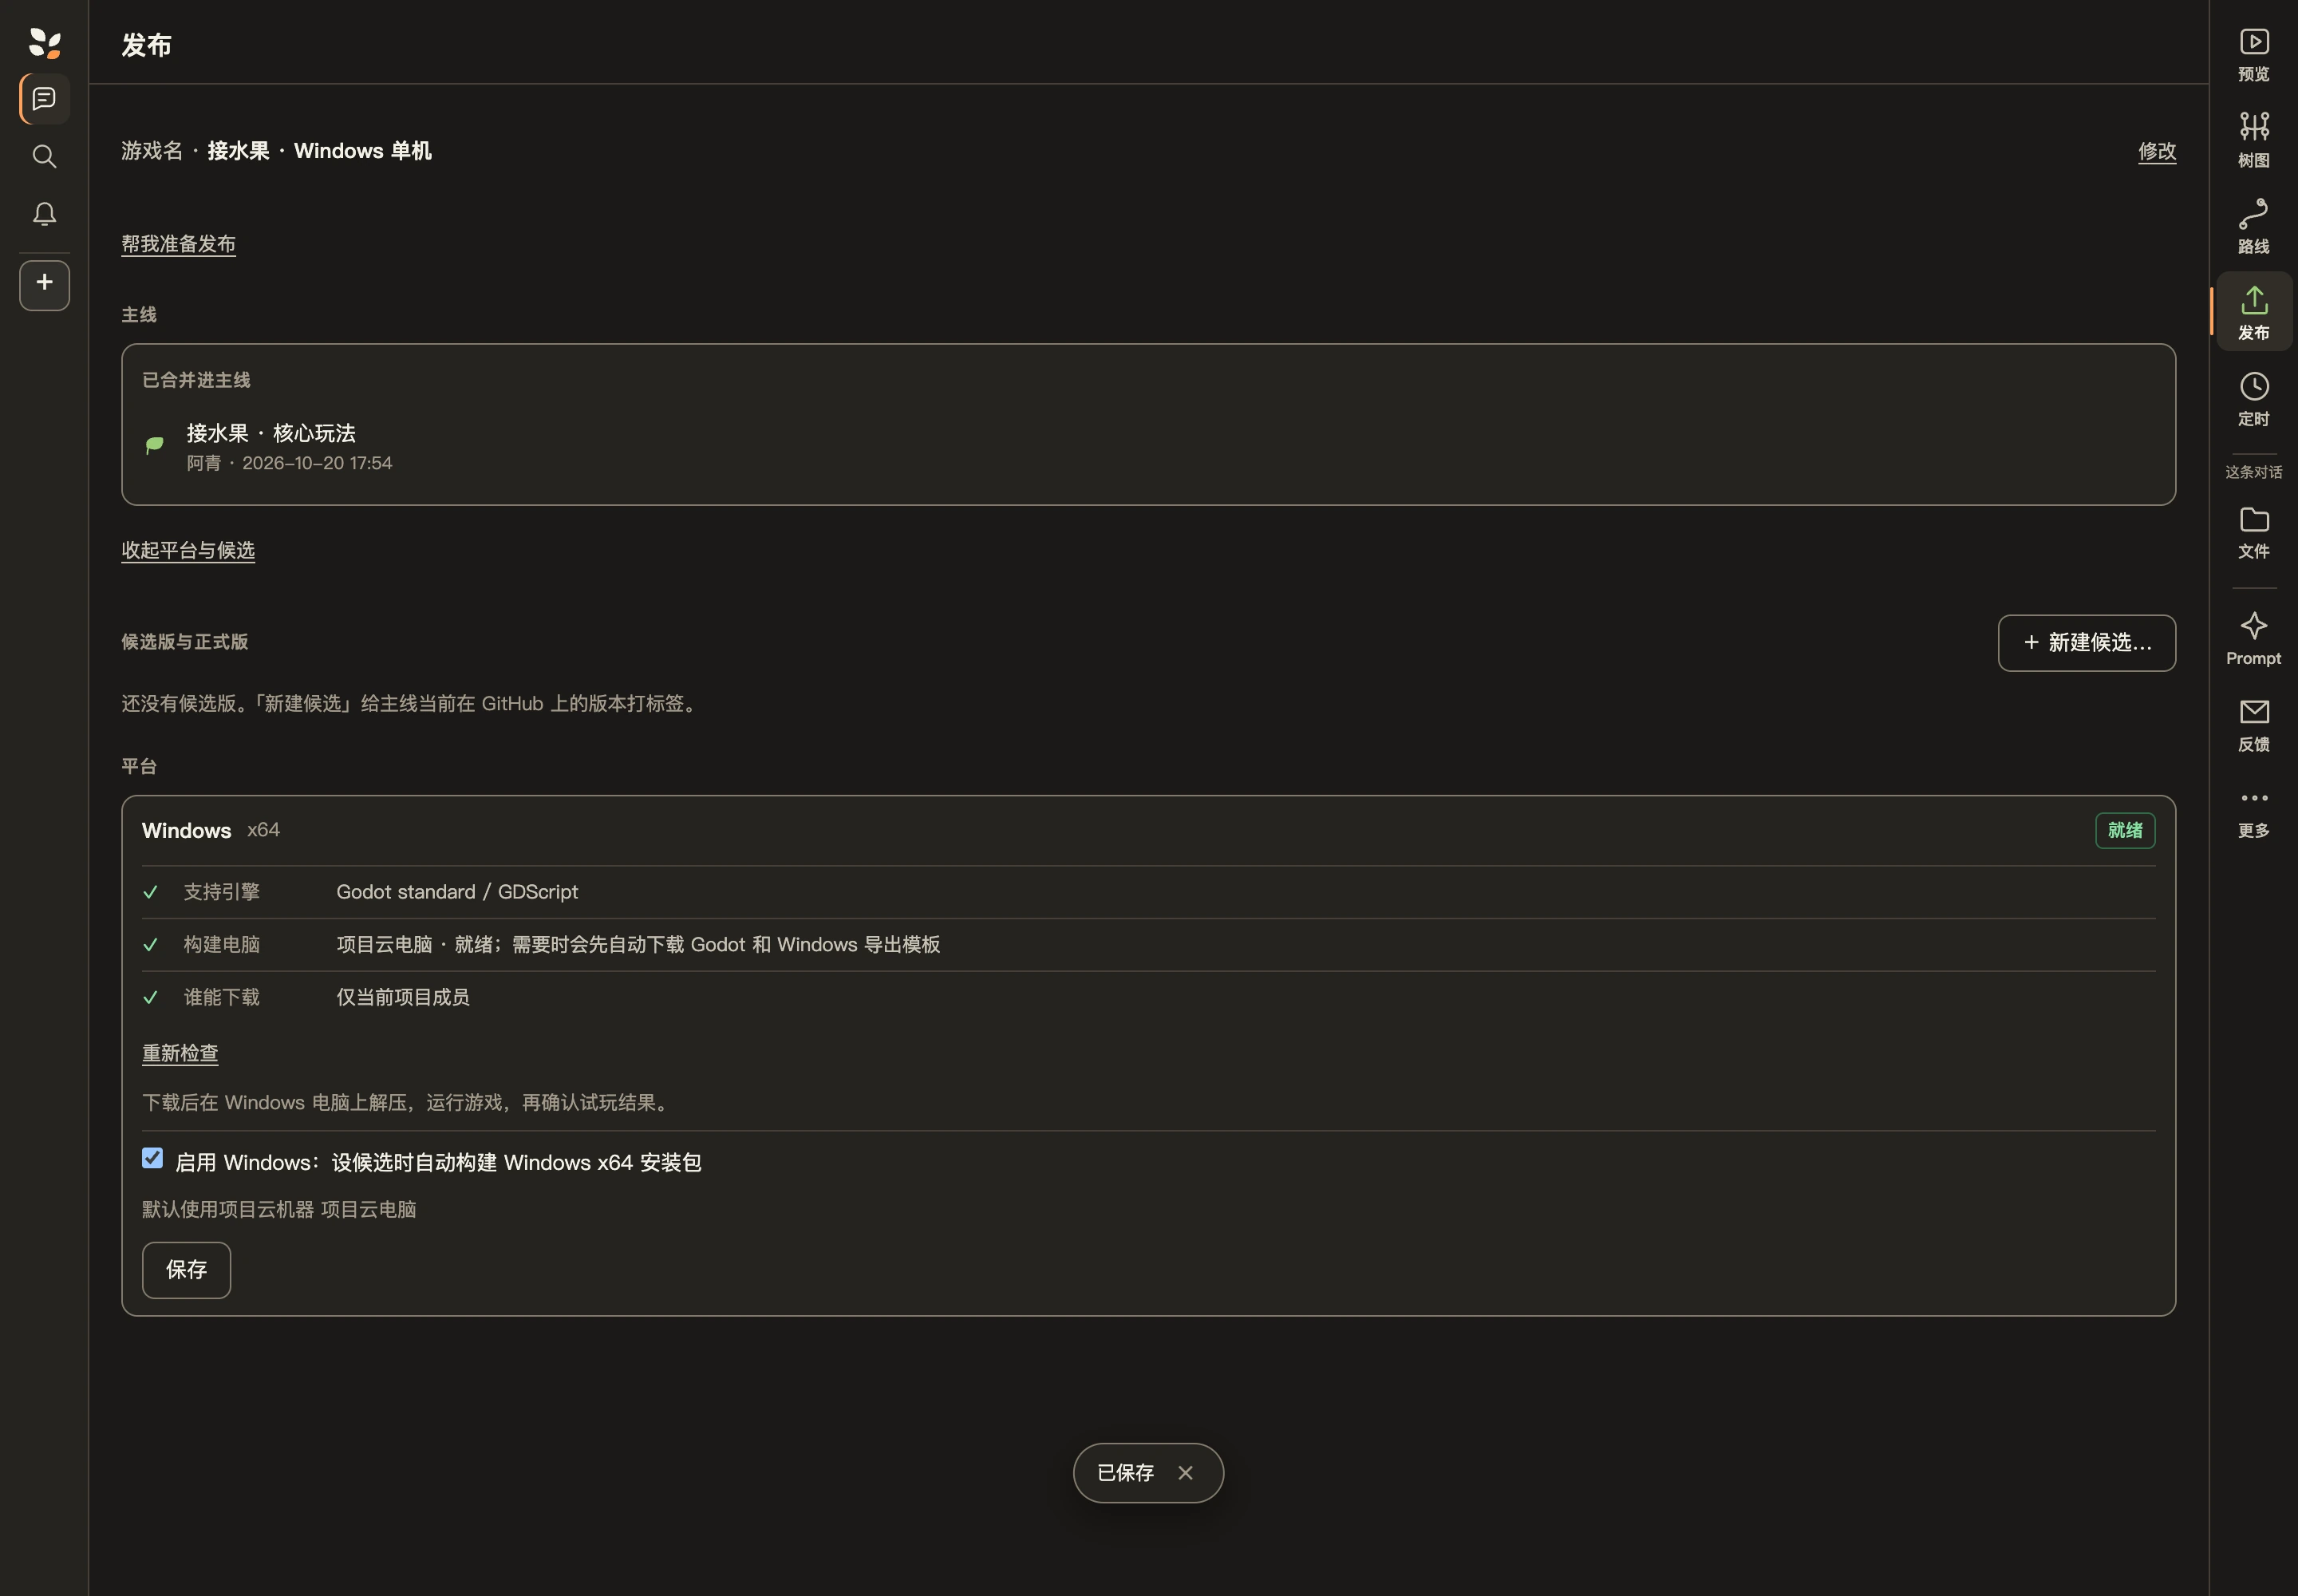
Merge the production task into mainline, then choose + New candidate…. Check main and the version number. The Windows row should name Windows ZIP download. Confirm and follow this candidate’s build progress; first-time preparation may take longer.
These earlier teaching captures locate the controls. Their project, task and build content belongs to the fruit-catching sample, not this tactical RPG.
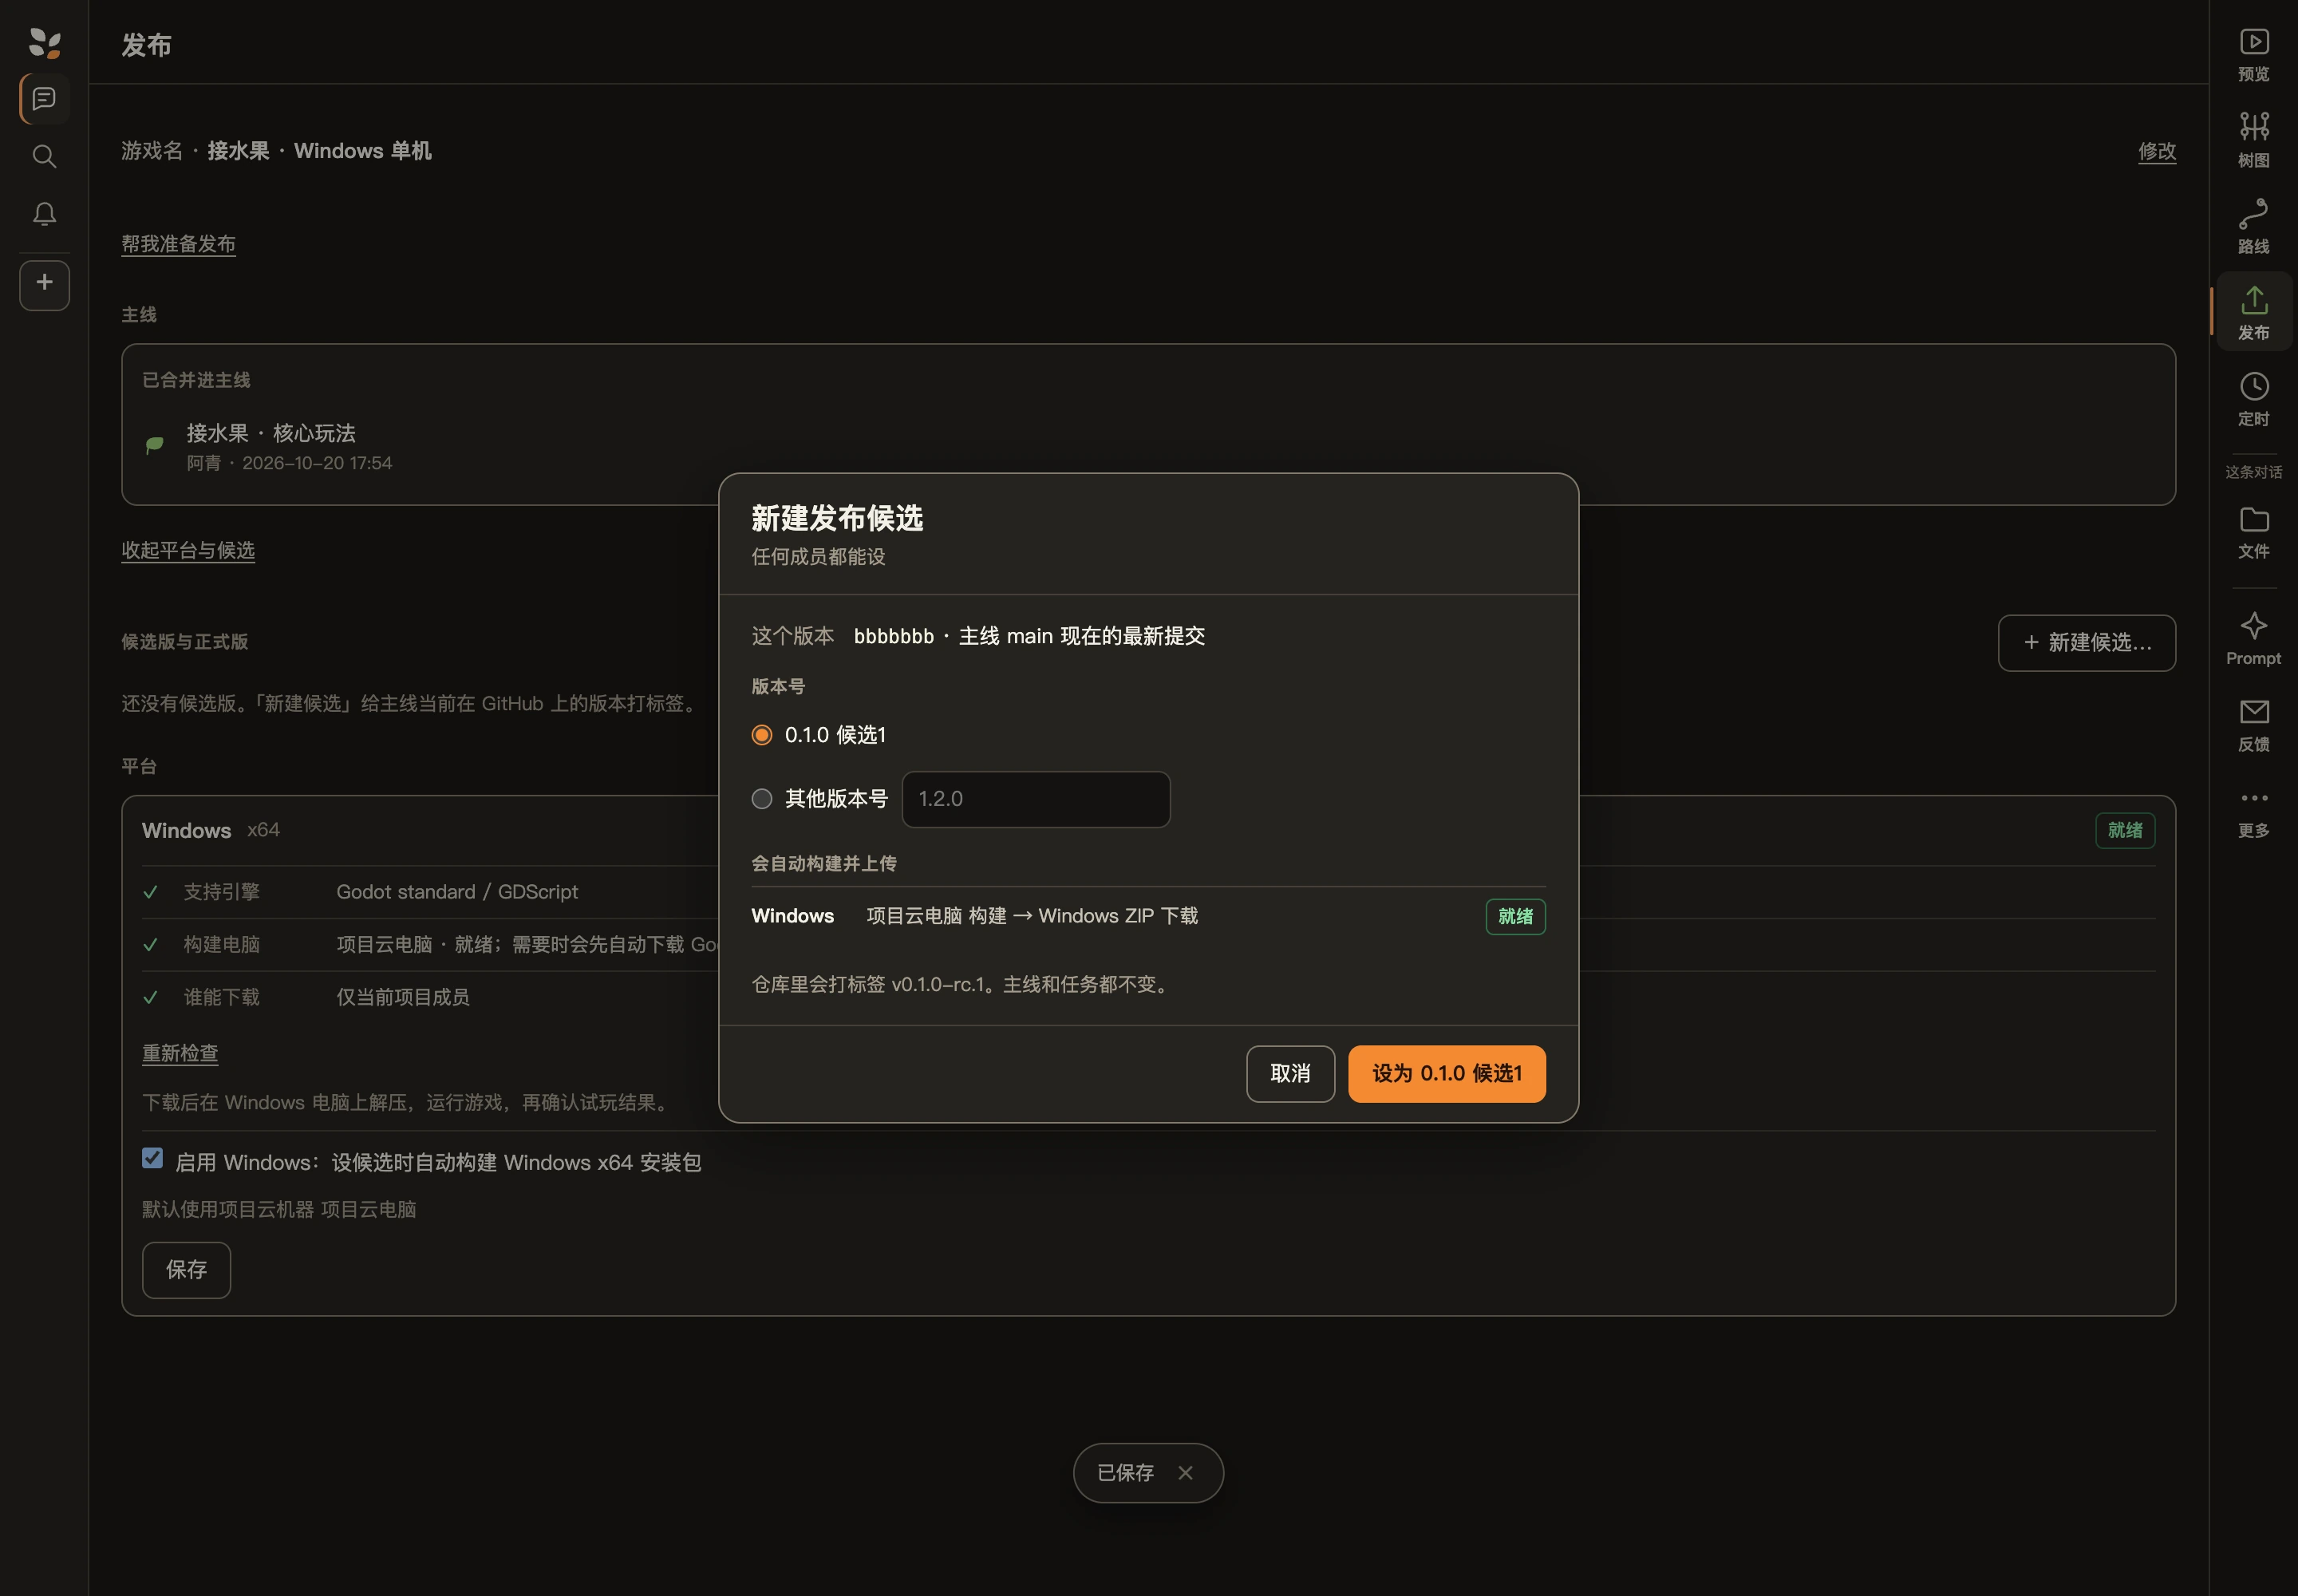
These earlier teaching captures locate the controls. Their project, task and build content belongs to the fruit-catching sample, not this tactical RPG.
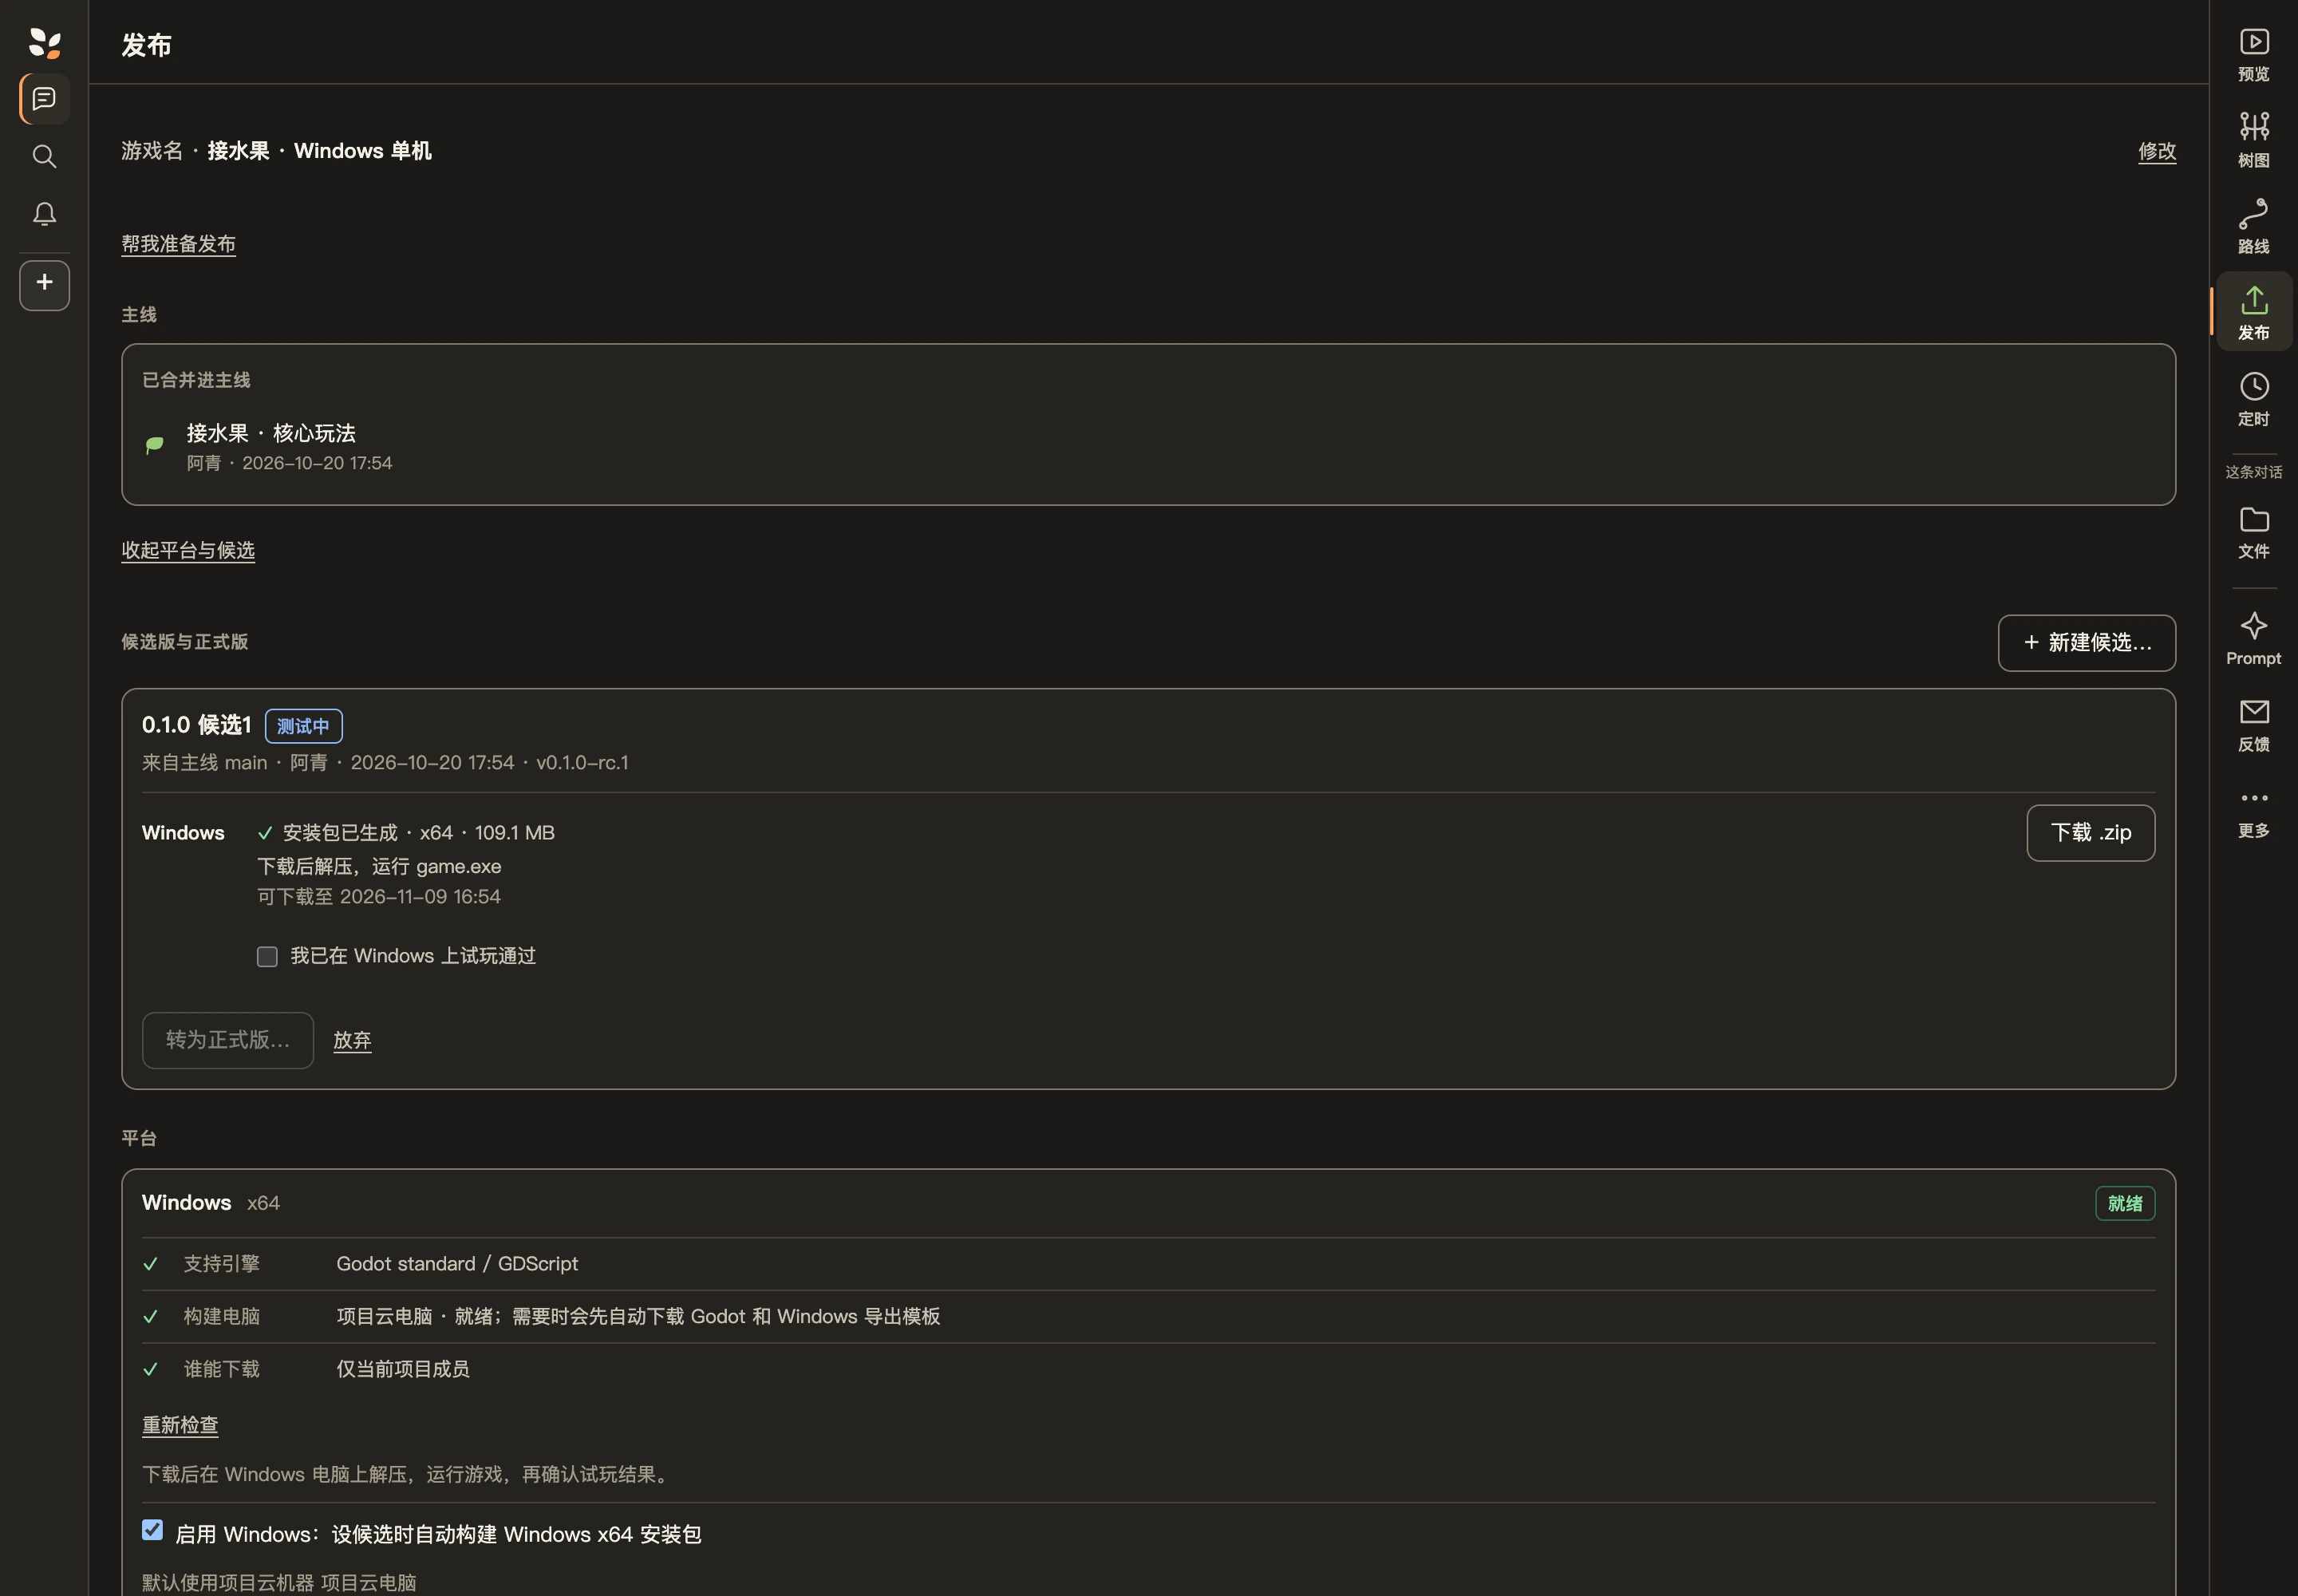
Choose Download .zip in the Windows row. Extract the complete archive, keep all its files and launch game.exe.
Check movement, turn order, attacks, win/loss and restart, then window/fullscreen, sound and exit. Test offline operation if required; reopen to check saves when present.
After personally passing this package on Windows, check I have playtested this on Windows. Share the complete ZIP when delivering to nonmembers; project download links require current membership.
Read the failed row and How to resolve. Use Let AI fix for project errors. Follow the page’s guidance for computer/environment problems, then retry or create a new candidate. Keep the version, error and reproduction steps instead of duplicating requests.
A browser development preview is not a publicly published Web release. Windows ZIP delivery, public Web publication on minigrove.games and Steam distribution are separate steps; Steam requires additional preparation.
Projects with Web publication enabled can publish publicly to minigrove.games.
Open 🚀 Release → Platforms and candidates. If Web is not enabled, the owner enables it and selects a capable build computer. Choose + New candidate…, check the mainline source and commit, choose a version number and confirm. When this candidate’s Web build shows Build preview, select Preview ↗ on that same row. This is a fixed version; later mainline changes do not automatically replace it.
These earlier teaching captures locate the controls. Their project, task and build content belongs to the fruit-catching sample, not this tactical RPG.
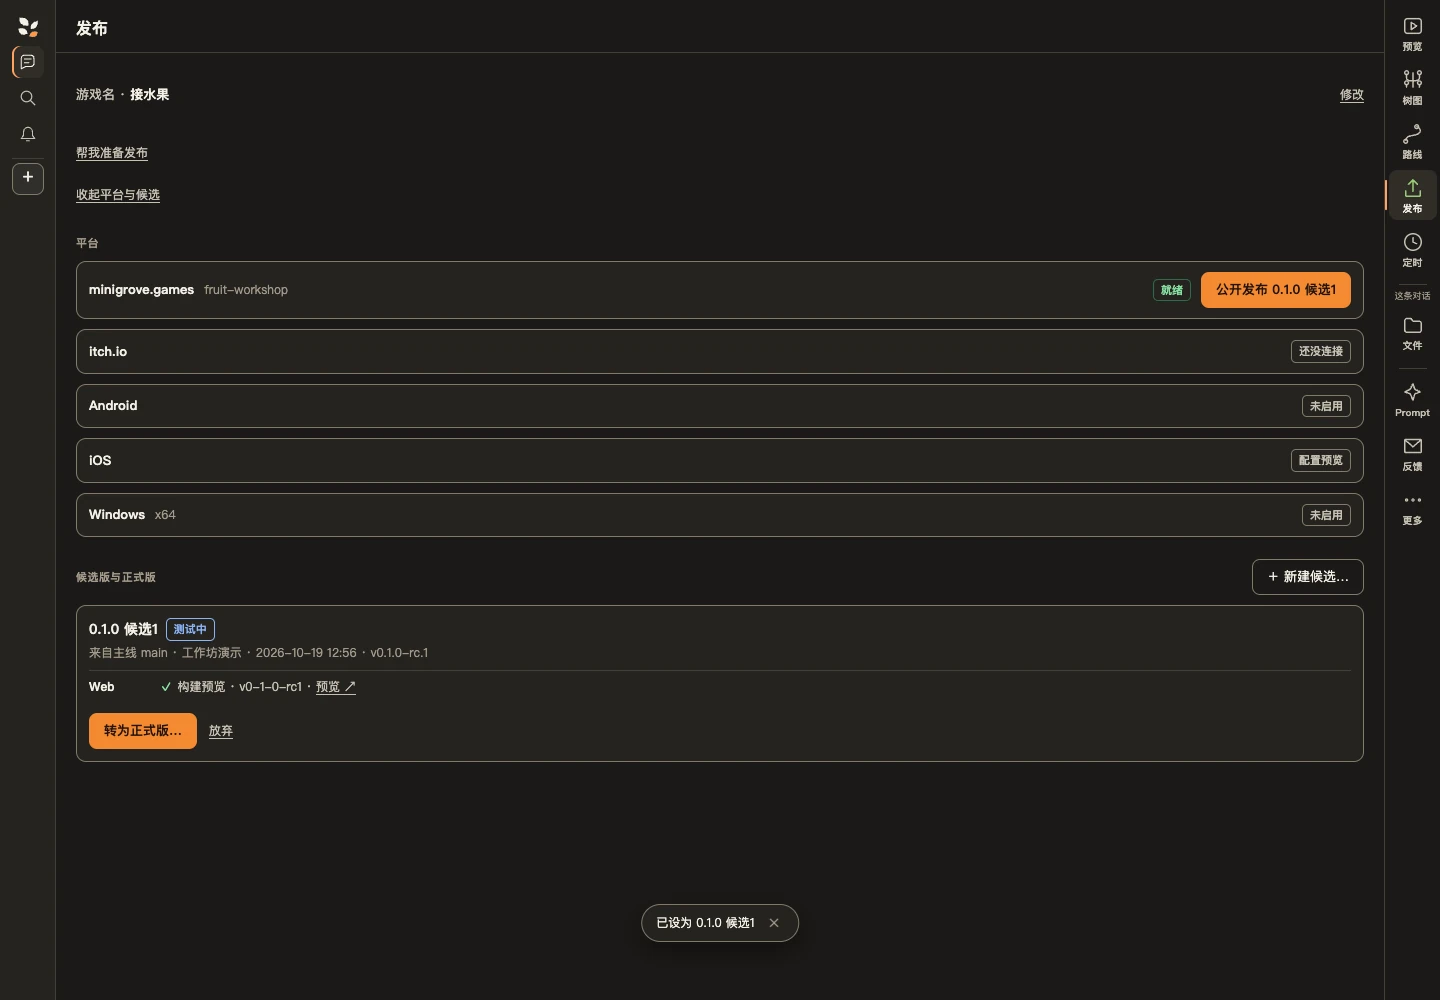
Choose Publish publicly in the minigrove.games platform row. Check its candidate and Web label, then review title, description, cover and visibility. Later mainline changes need a new, tested candidate.
Three identifiers for the same version
v0.1.0-rc.1
main @ b84539f2909a3d870c288e1237b7b57b4add974c
v0-1-0-rc1
Check main’s commit when creating the candidate. Once its build is ready, note the Web label on that row. After choosing Publish publicly, the version selector and preview must name that same Web label. The public form shows the build label; check the source commit back in candidate details.
These earlier teaching captures locate the controls. Their project, task and build content belongs to the fruit-catching sample, not this tactical RPG.
These earlier teaching captures locate the controls. Their project, task and build content belongs to the fruit-catching sample, not this tactical RPG.
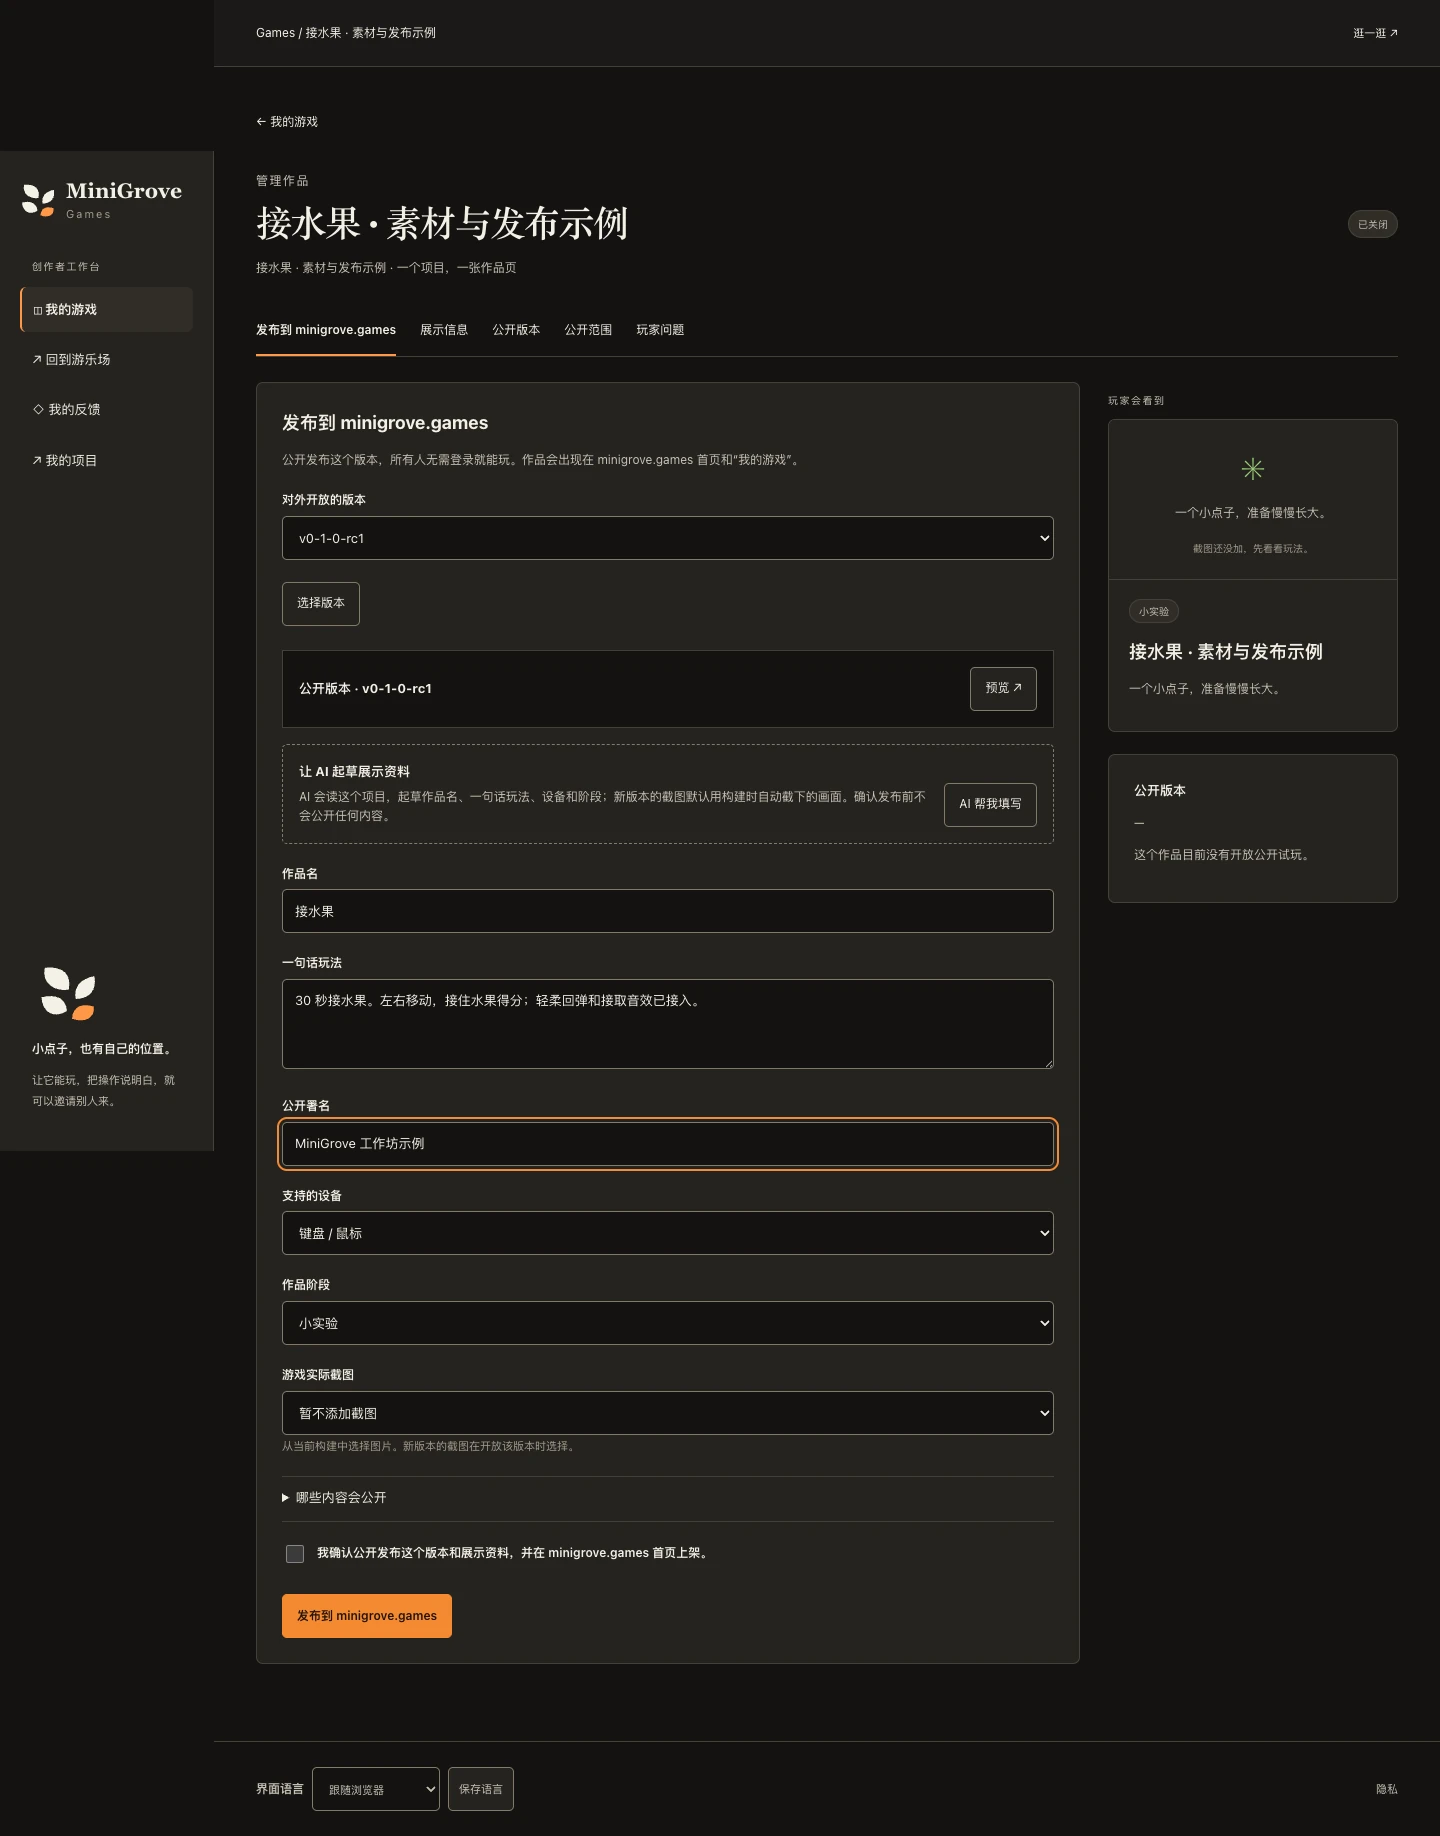
When ready to make it public, the owner submits the publication form. Open the public URL in a window without project access and play it. Later updates need explicit publication again; the recording stops before confirmation.
07 / 09 · Advanced workflows
Add animation, sound or a release plan when needed. Define deliverables, compare options, integrate and review.
Start with a character reference and one action: idle, walk or attack. Approve key poses, generate the sequence, then integrate it into the game. Seedance is another animation option, usually at a higher cost. Choose for your art style, motion needs and budget; validate one short action before producing a batch.
Supply a reference, direction, style and loop requirement. Start with one action.
Check silhouette, foot position and timing. Inspect frames for distortion and the loop for jumps.
Request transparent frames or a sprite sheet, then connect it to character states. Test transitions in the game.
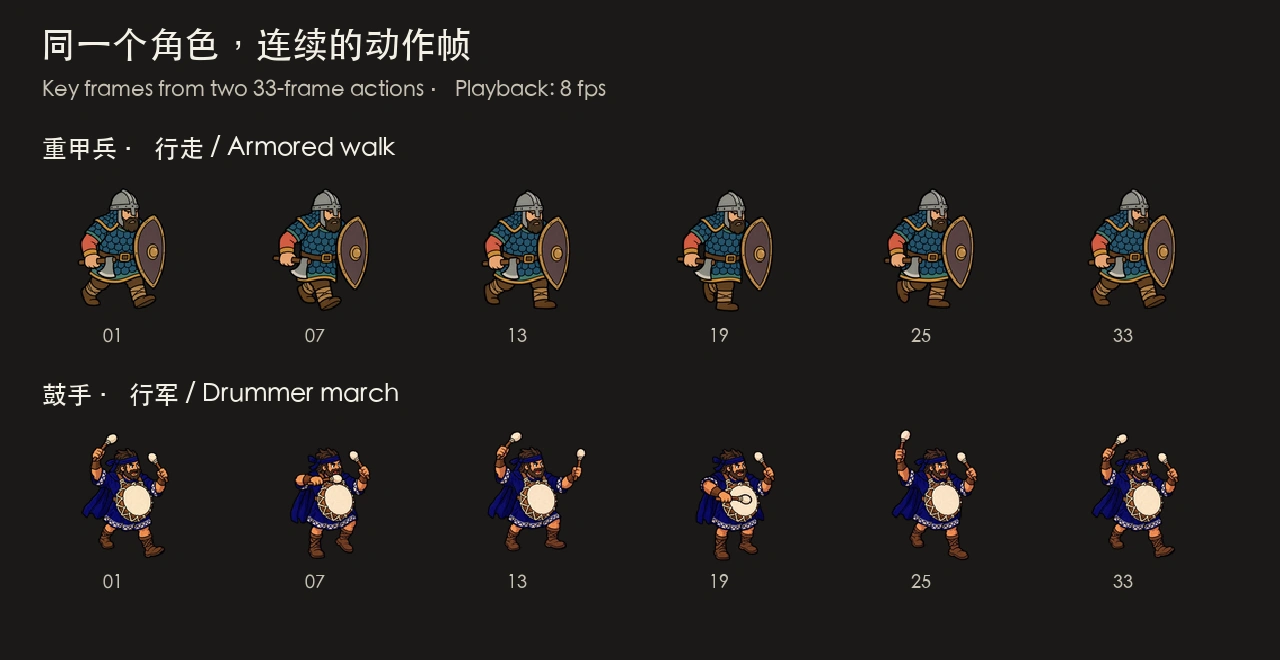
Use this armored character reference for a right-facing walk cycle. Preserve the face, armor and shield, keep a stable foot anchor and use transparency. Show key poses and playback first. After approval deliver frames or a sprite sheet, then integrate the walk state without changing gameplay or audio.When listed in the project’s skill menu, use /mg-sprite-gen for character frames and /mg-build-character-frame-animation to build the animation.
These earlier teaching captures locate the controls. Their project, task and build content belongs to the fruit-catching sample, not this tactical RPG.
Task A · Catch animation. Start from current mainline. Add basket squash-and-stretch on catch. Change animation only; preserve collisions, values and audio. Provide two previews, integrate the chosen one, and list changed files, preview and acceptance steps.For music, specify mood, length and looping. For effects, specify trigger, duration and repeated behavior. Audition two options before integrating. External audio services may need another key; state missing prerequisites or start with procedural sound effects.
These earlier teaching captures locate the controls. Their project, task and build content belongs to the fruit-catching sample, not this tactical RPG.
Task B · Attack sound. Start from current mainline. Make short basic-hit and battle-victory sounds. Provide two playable samples before integrating the chosen one. Change audio only; preserve visuals and rules. Control repeated-trigger volume. List sample locations, final assets, triggers and preview.Listen to the actual files (opens a new window): A · Soft catch · B · Bright catch · Chosen single catch sound
DELIVERY.md: chosen files and triggers
assets/art/basket.svg
src/style.css → catch-pop
assets/audio/catch-soft.wav
src/game.js → catchFruit()
assets/audio/round-end.wav → remaining <= 0
These paths belong to the browser demo project; ask AI for the actual paths in Godot or other engines. Choose A · Soft squash-and-stretch and catch-soft.wav. Audition files repeat; the integrated effect is the short single sound. catchFruit() triggers animation and sound together. Repeated catches reuse the player and reset its position to avoid overlapping tracks.
Agree on milestones and responsibilities before production. Name confirmed owners only; leave undecided work unassigned.
When the project supports roadmaps and a capable computer is available: 🗺 Roadmap → Design roadmap. On phones, choose Roadmap from More.
These earlier teaching captures locate the controls. Their project, task and build content belongs to the fruit-catching sample, not this tactical RPG.
Share platform, date, scope and capacity; ask AI to draft first.
Agree with teammates, then confirm owners, reviewers and unassigned work.
After approval, view the roadmap and create tasks for ready work items.
These earlier teaching captures locate the controls. Their project, task and build content belongs to the fruit-catching sample, not this tactical RPG.
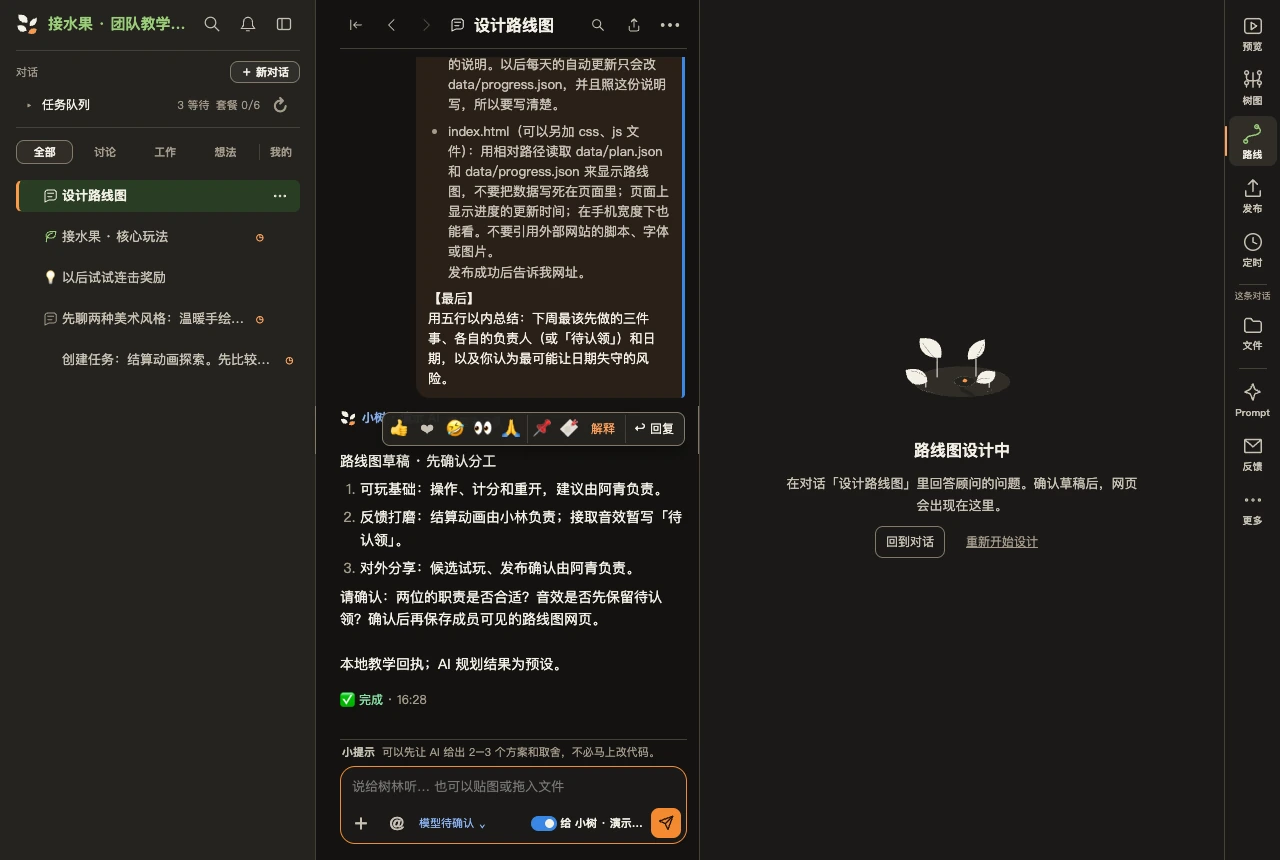
Inspect this project and plan from playable to release. Confirm platform, date, scope and capacity. List milestones, work items, owners, dependencies and acceptance checks. Draft first and save after our approval; do not create tasks or publish yet.The roadmap is visible only to project members. Listing an owner is a plan; confirm it with that person. Use I want to edit for changes, mention teammates to agree on execution and update progress in the roadmap. See same-chat handoff →
For example, have art pass character files, size and direction requirements to animation, then pass the result to integration. Name the destination task, files, approved choices and acceptance checks rather than only asking them to coordinate.
When direct handoffs are supported, the system delivers the message and files to the target task with source and delivery receipts. Check Sent to confirm delivery; follow any pending or limited-state instructions. Automatic chains are bounded and may need a member to continue. A handoff does not merge versions: playtest and merge into mainline separately.
Select a passage in a finished AI reply and choose Explain this passage to ask follow-up questions. Explanations are private to you and available in Ask on the side. Use them for terminology, code or unclear reasoning.
Use Personal settings → Tell MiniGrove your preferences to describe how you want to work, such as “lead with the conclusion and start with a small sample.” Keep communication preferences there; put game rules, chosen art direction and team decisions in the project for teammates to see. You can update these preferences from the same personal settings entry.
Use the conversation’s available branch or discussion entry to explore another option with the current context, such as speed-based turn order. State that you want discussion without edits first; create or continue production work after choosing a direction.
08 / 09 · Games and inspiration
Explore the gameplay and styles of public games on minigrove.games.
Bring a game link and the details you like into a discussion to compare approaches for your project.
09 / 09 · FAQ
Setup, previews, allowance and platform support.
Check the preparation step, latest update and any error. The first setup can take longer; gather ideas while it progresses. If it stalls or fails, keep the page link, step and message for support instead of repeatedly creating projects or resending tasks.
It depends on your account's plan, and is also limited by the project's computer capacity. Covered projects share account capacity. BYOK does not increase it. Check your current plan and computer capacity.
Check the current conversation’s task name and Preview label. Follow the current task if another is shown, and open an offered update. A selection subtask, its parent and a mainline candidate are different versions; review final mainline through the matching candidate in Release.
A subtask opened with Subtask merges back into its fixed parent once its checks pass, possibly before your own playtest. AI/build checks do not mean you approved the feel. For a change you want to try before it comes back, skip Subtask and ask in the current task; if a merged change is not right, ask for more. Subtasks have their own progress strip; ordinary tasks use Merge into mainline.
During development, prioritize browser playtests and preview marks in an embedded preview. For issues found in the final Windows package, send screenshots, candidate version, reproduction steps and expected behavior to a fix task. Browser checks do not replace Windows testing.
A Godot project on a computer with the required build capability can produce a Windows package. Download it and test startup, input, audio and exit on Windows. This Web example does not prove a desktop build; Steam release needs separate preparation.
No. They choose who pays for the model; concurrency and computer capacity still follow the current plan and machine. Members share the project’s current model source without configuring it individually. The project owner changes the source when needed.
For MiniGrove issues or suggestions, use Feedback on the right rail; on narrow screens choose More → Feedback to developers. Continue game-production requests in your project’s AI tasks.
MiniGrove product plans and feature ideas ↗
See what MiniGrove is building, share a public idea or choose “I need this too”; sign in when prompted. Use private project feedback for account issues and logs.
Open @ below the composer and select MiniGrove support. Include what you are doing, where you are stuck, expected and actual results, and a screenshot or error reference. This reaches human support; send game-production instructions to the project AI.
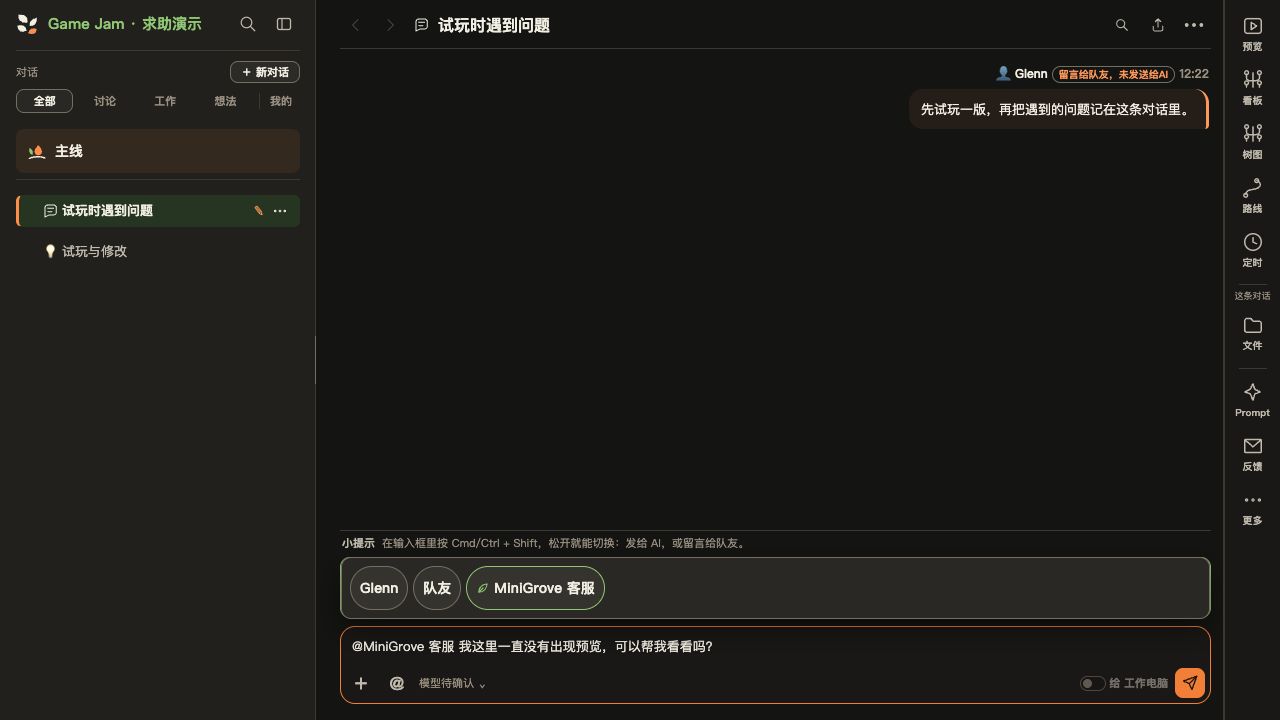
Before sending, review the optional 7-day project access grant. You can uncheck it or revoke it later. Grant access as needed; response time follows the actual support reply.
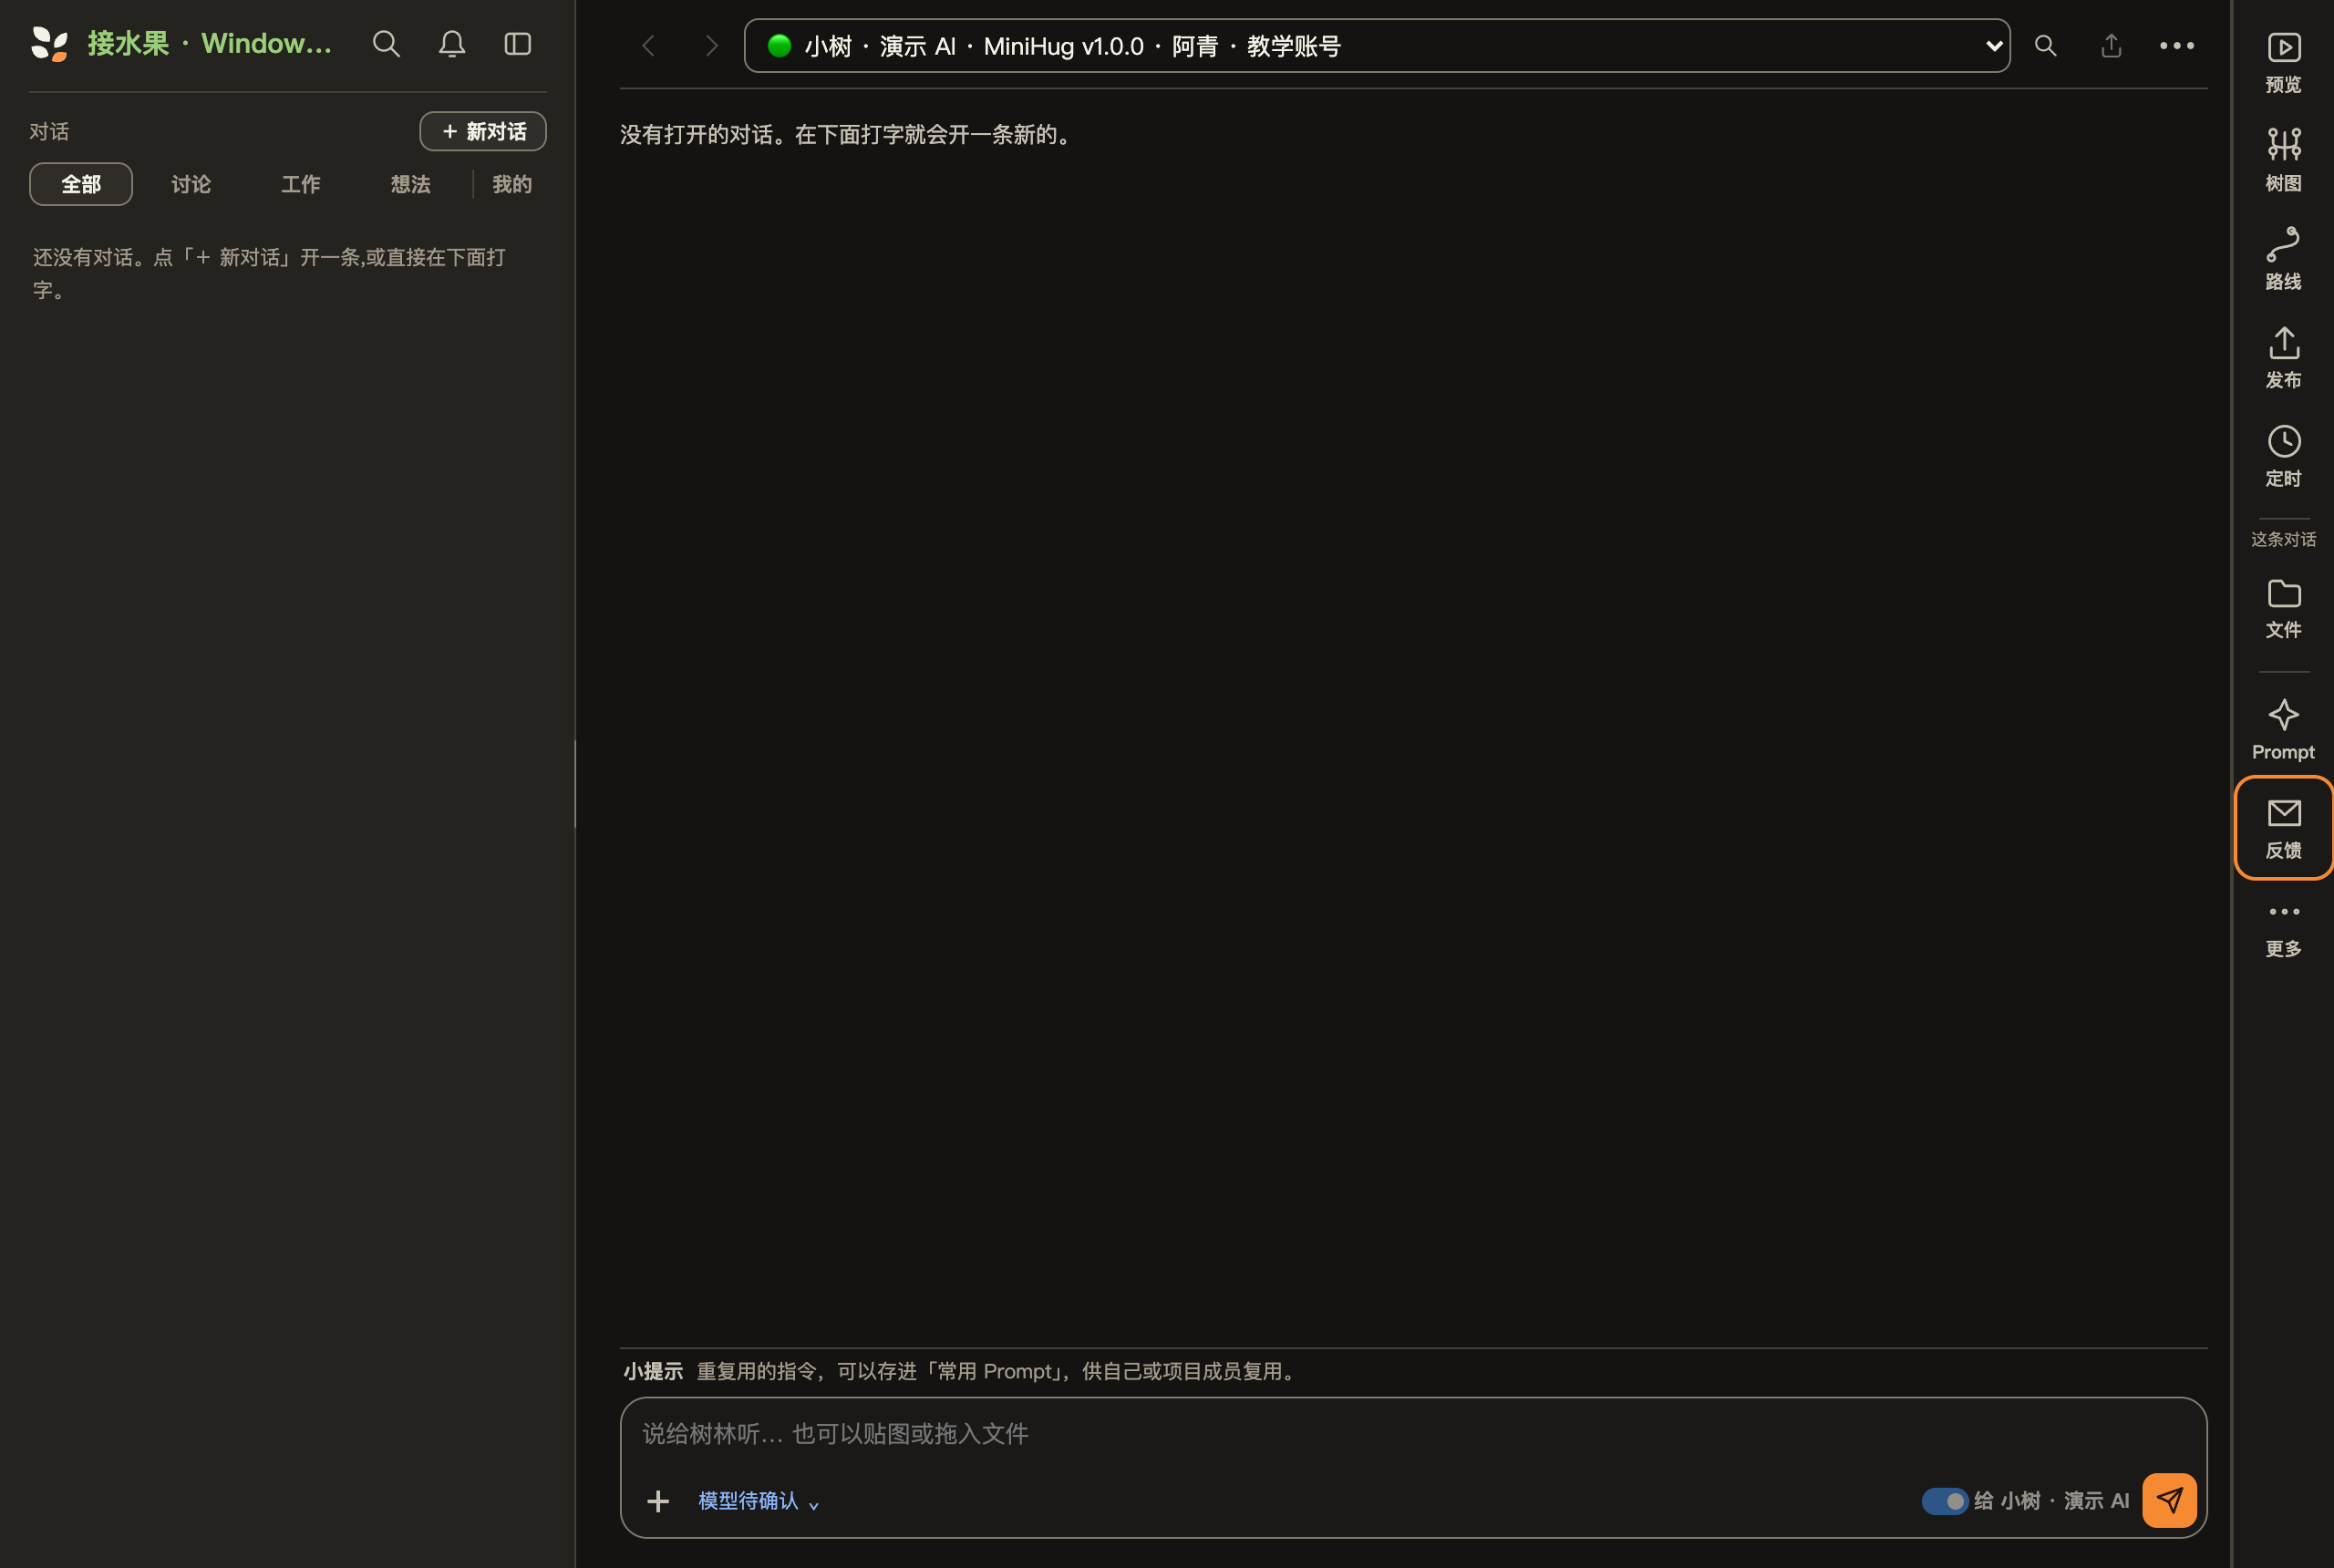
Include the page, steps, expected and actual results, and any error message or reference. Sending includes your name, email, project ID and browser version; replies go to your email. Keep keys, passwords and authorization codes out of the report.
For screenshots or recordings, or if Feedback is unavailable, email [email protected] with the page link and reproduction details.
Help us improve
Need help? Keep the page link, steps and error message. [email protected]
This tutorial uses local UI captures and seeded states; it does not establish completed AI production, Windows build acceptance or public publication.